> For the complete documentation index, see [llms.txt](https://docs-embed.anyflow.jp/llms.txt). Markdown versions of documentation pages are available by appending `.md` to page URLs; this page is available as [Markdown](https://docs-embed.anyflow.jp/solution-editor/triggers/outgoing/my-event/access-token.md).
# アクセストークンの発行
My Event エンドポイントなどの `/sdk` で始まるエンドポイントを使用するにはアクセストークンが必要です。
アクセストークンは、各エンドポイントの `Authorization` ヘッダーに `Bearer {アクセストークン}` の形で指定します。
## **アクセストークン発行 API**
**`POST https://for-product-api.anyflow.jp/sdk/token`**
アクセストークンを発行します。発行されるアクセストークンの有効期限は5分間です。アクセストークンの有効期限が切れた場合はもう一度発行してください。
アクセストークンの発行には一度アクセストークンの発行に使用した JWT は使用できません。常に新しい JWT を指定して下さい。
### **リクエスト**
JSON形式でリクエストを送信します。
{% hint style="success" %}
### ヒント
詳細な仕様は[ APIリファレンス](/anyflow-api/end-user-api.md) をご確認ください。
{% endhint %}
## **ウィザードホスティングの場合**
[ウィザードホスティング](/release/wizard-hosting.md)でソリューションを提供している場合、\
アクセストークンは画面の表示が切り替わるごとに自動で発行され、開発者コンソールから取得することが可能です。
自社プロダクト側でこのトークンを取得することは難しいため、検証目的として利用してください。
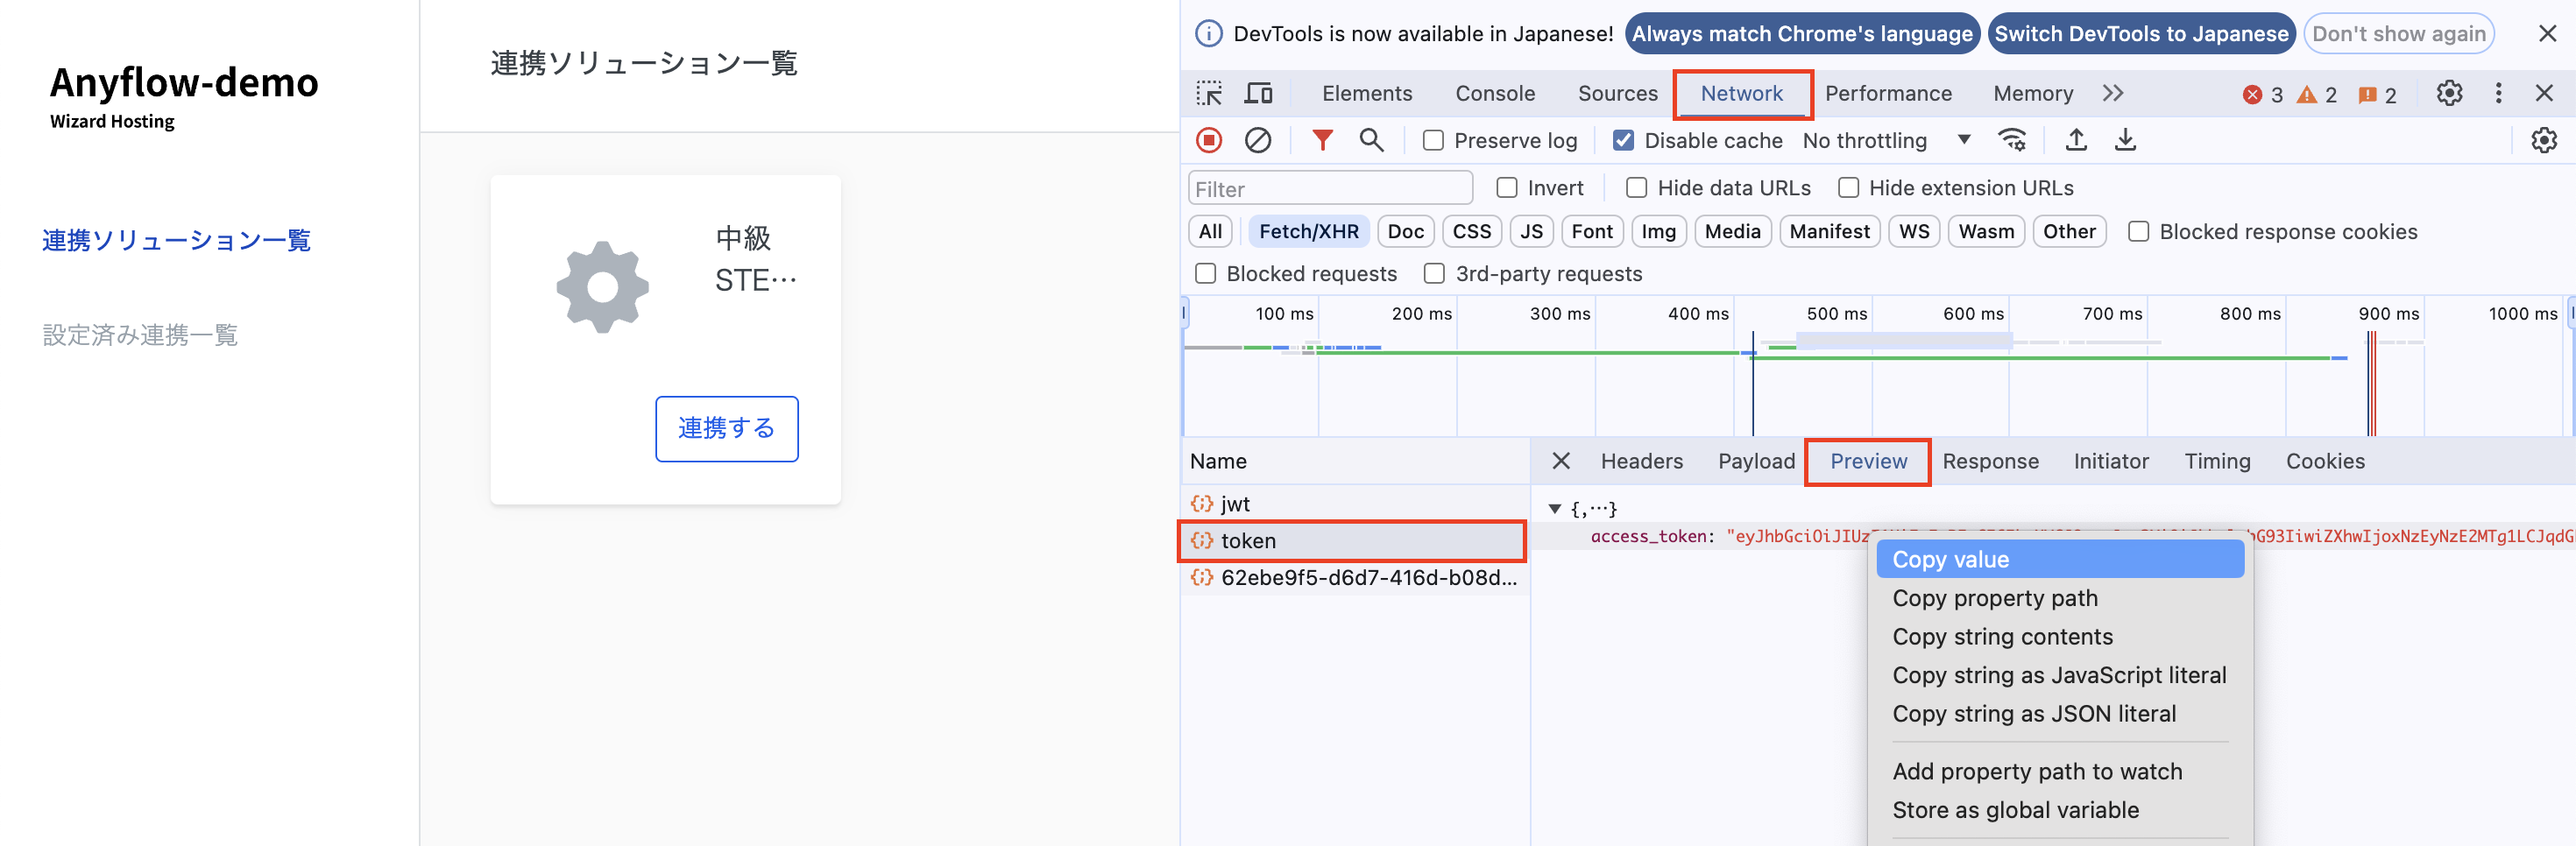
### **開発者コンソールからアクセストークンを取得する方法**
1. ウィザードホスティングにアクセスします
2. 右クリックメニューから「検証」を選択します
3. 「Network」タブを選択します
4. 「Fetch/XHR」を選択します
5. 画面をリロードします
6. 「token」の項目を選択し、「Preview」を確認します
7. 右クリックし「Copy Value」で値をコピーするとアクセストークンを取得できます
### **検証を何度か行う場合は**
アクセストークンは一度使用されるか、発行後10分経過すると失効してしまい、再度開発者コンソールから取得する必要があります。
そのため、検証を何度か行う場合は、通常通り[自身のコードでJWTを生成し](/release/embed/generate-jwt.md)アクセストークンを取得することを推奨します。
ただし、ウィザードホスティングでソリューションを提供している場合は、JWTのペイロードのいくつかの項目はウィザードホスティングにより既に決定しているため、それを一度だけ開発者コンソールから取得しておく必要があります。
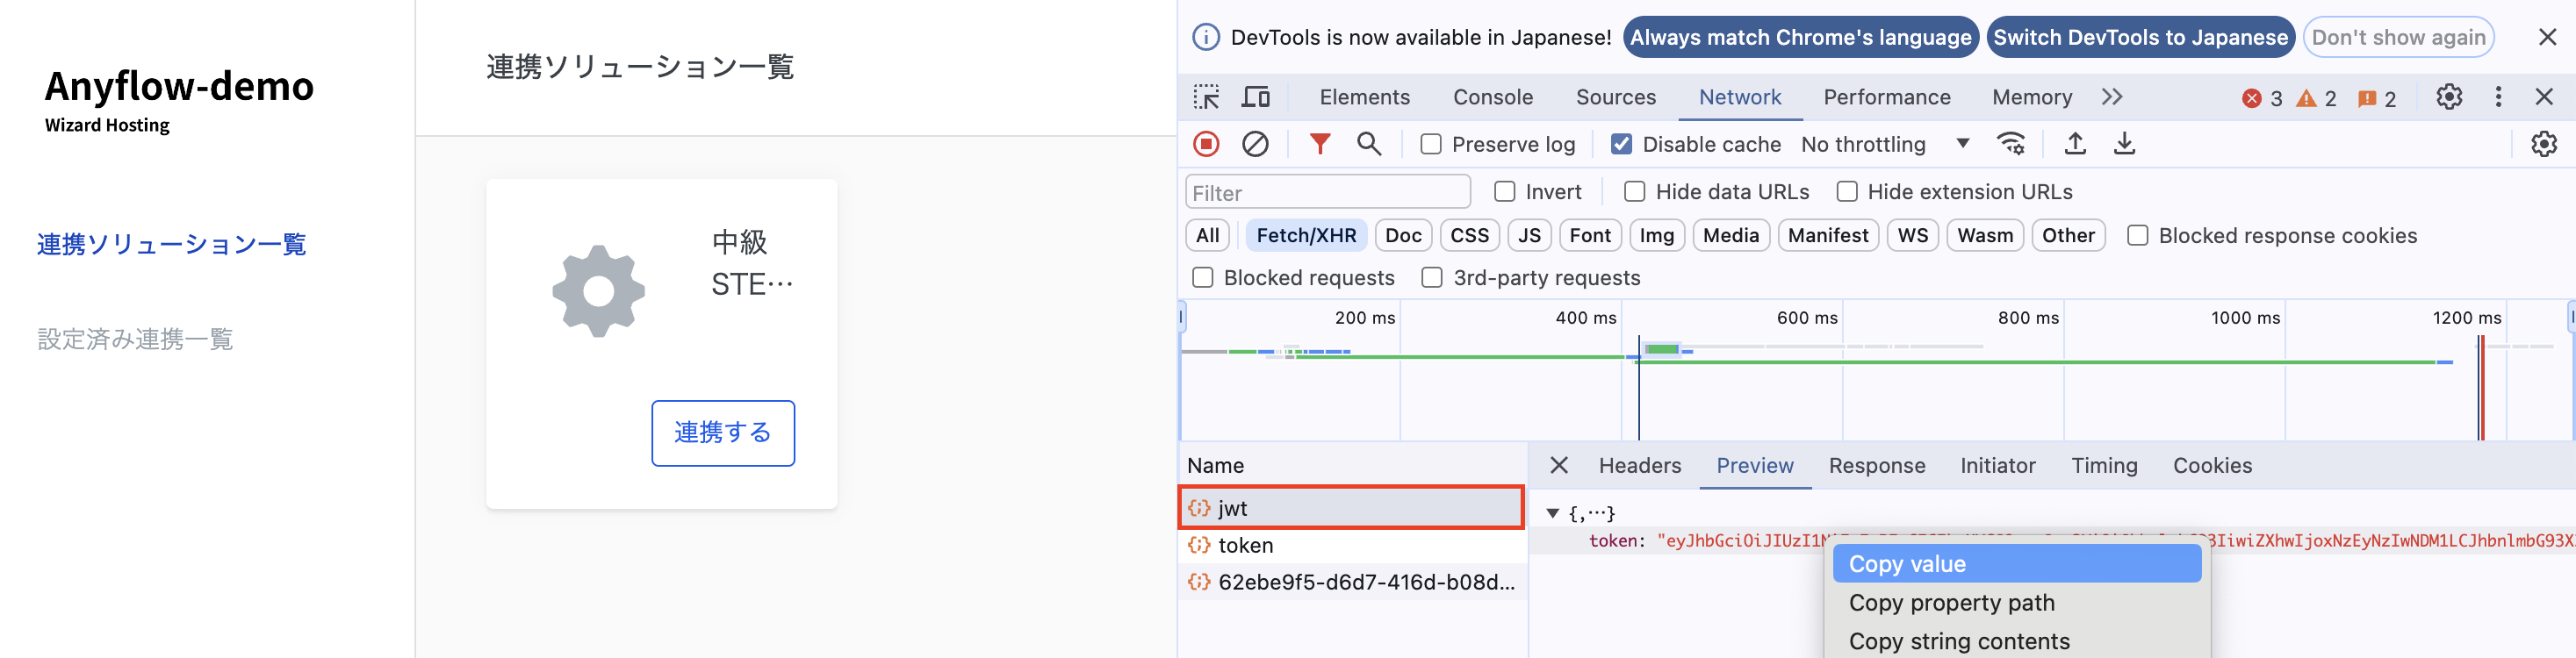
1. トークンを取得した時と同様の手順でコンソールの「Fetch/XHR」を開きます
2. 「jwt」の項目の項目を選択し、「Preview」を確認します
3. 右クリックし「Copy Value」で値をコピーします
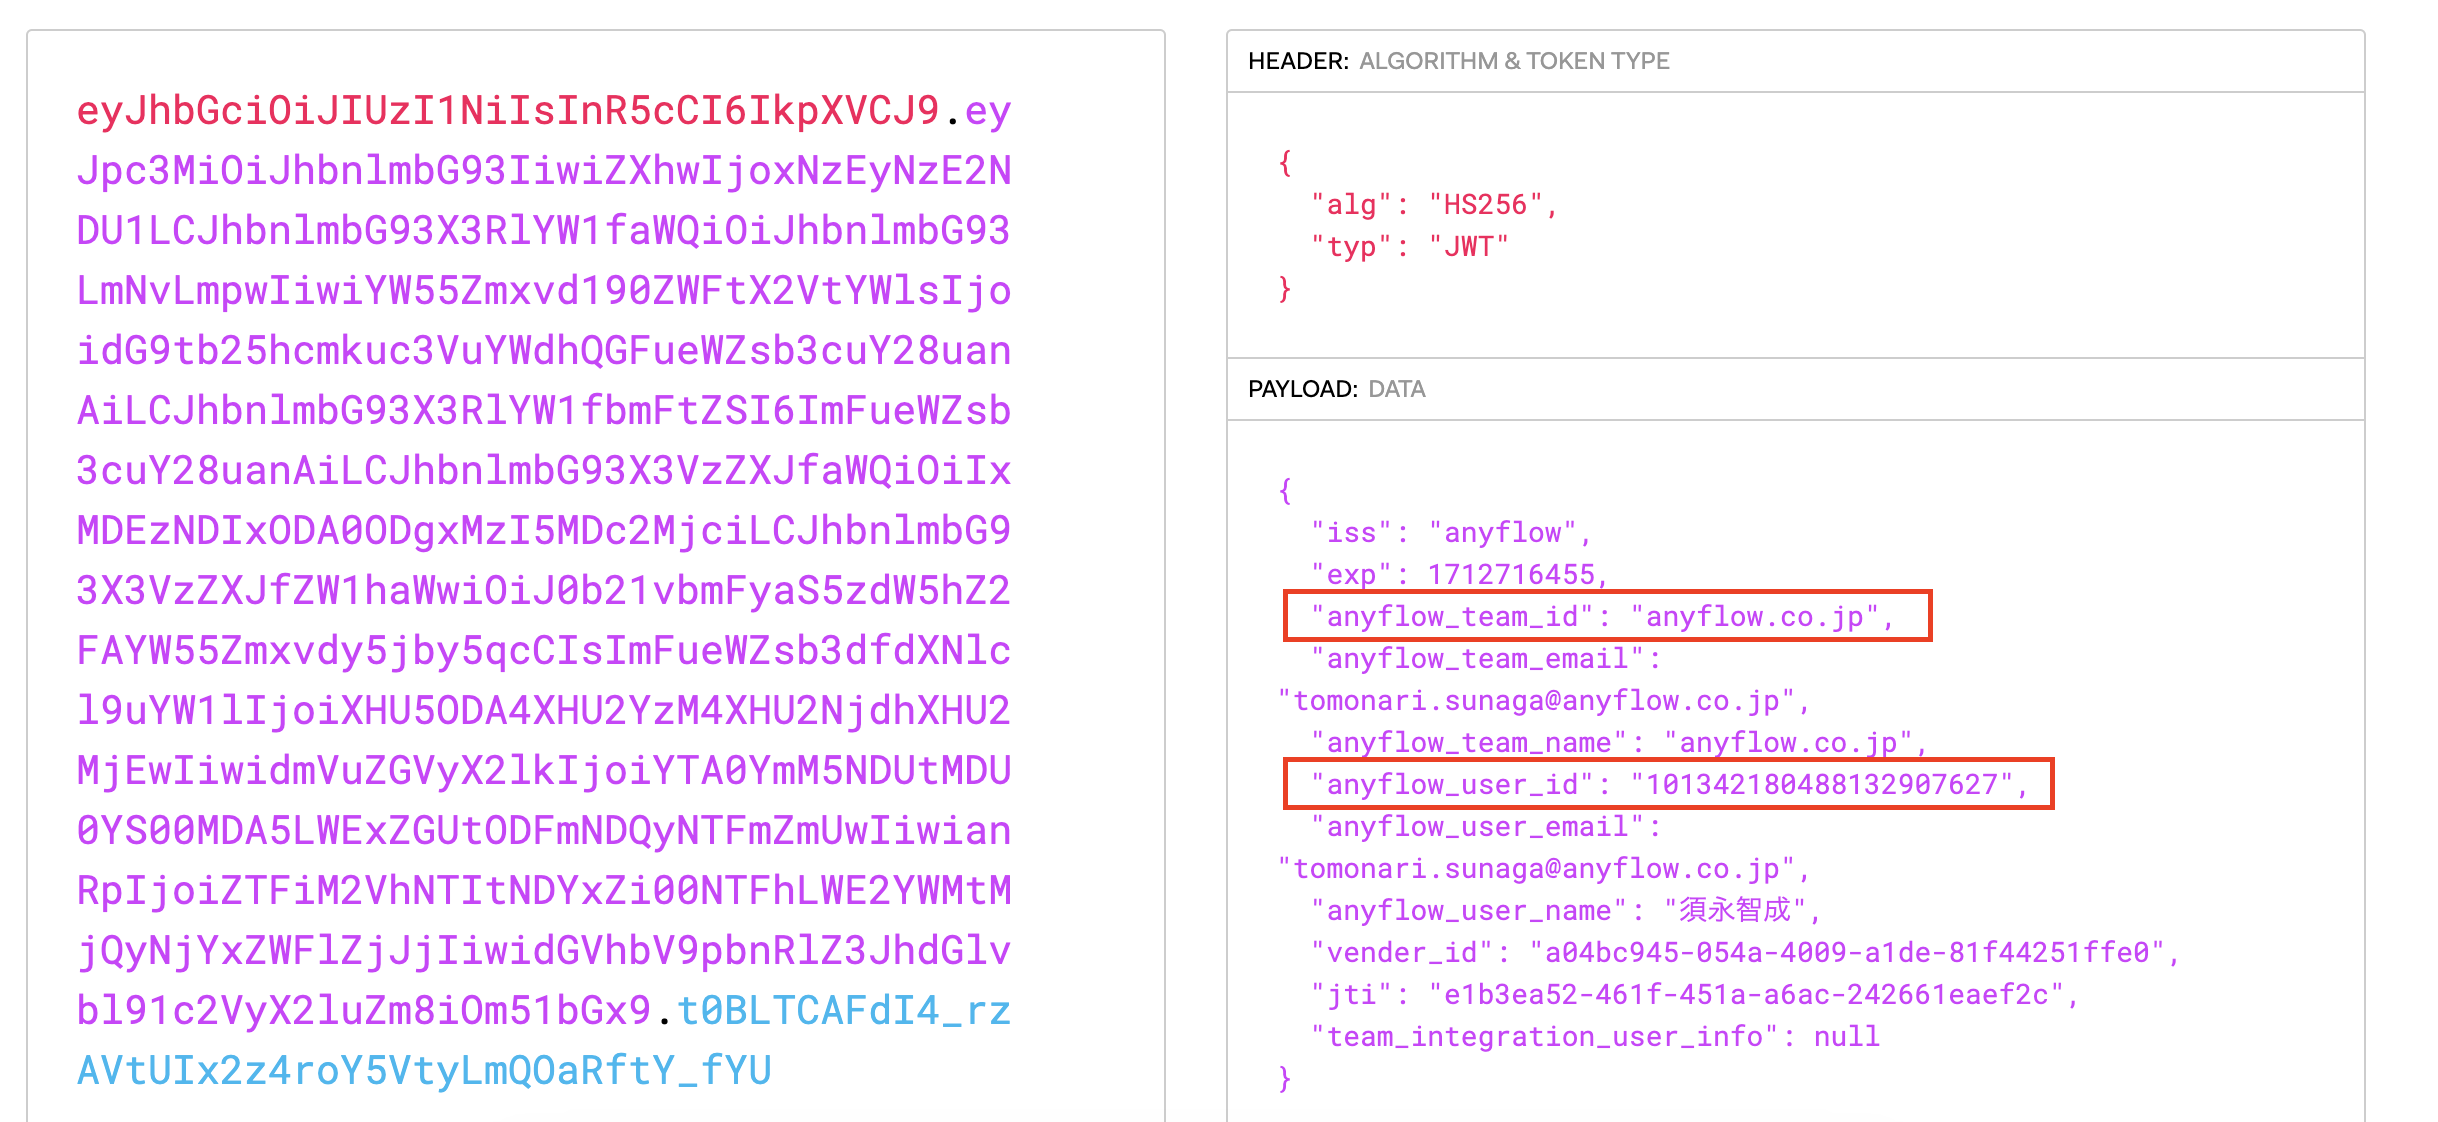
4. [jwt.io](https://jwt.io/)にアクセスし「Encoded」の欄に値をペーストします
5. 「Decoded」の欄から以下の値を取得します
1. anyflow\_team\_id
2. anyflow\_user\_id
6. 通常通り[自身のコードでJWTを生成](/release/embed/generate-jwt.md) します。JWTのペイロードに含める値について、
1. `anyflow_team_id,` `anyflow_user_id` は上記で取得した値を使います。
2. `iss`は Anyflow CSチームから提供された値を使います。
3. それ以外の値は任意の値を設定します。
7. 発行したJWTを使ってアクセストークンを取得します。
---
# Agent Instructions
This documentation is published with GitBook. GitBook is the documentation platform designed so that both humans and AI agents can read, navigate, and reason over technical content effectively. Learn more at gitbook.com.
## Querying This Documentation
If you need additional information that is not directly available in this page, you can query the documentation by asking a question.
Perform an HTTP GET request on the following URL with the `ask` and `goal` query parameters:
```
GET https://docs-embed.anyflow.jp/solution-editor/triggers/outgoing/my-event/access-token.md?ask=&goal=
```
`ask` is the immediate question: it should be specific, self-contained, and written in natural language.
`goal` is what the user is ultimately trying to achieve, the reason they need the answer. Sharing it helps GitBook give you a better, more relevant answer. A goal is most helpful when it describes the outcome the user wants rather than restating the question. For example, with `ask=how do I create an API token`, a goal like `automate deployments from our CI pipeline` lets GitBook tailor the answer to that use case.
The response will contain a direct answer to the question and relevant excerpts and sources from the documentation.
Use this mechanism when the answer is not explicitly present in the current page, you need clarification or additional context, or you want to retrieve related documentation sections.