> For the complete documentation index, see [llms.txt](https://docs-embed.anyflow.jp/llms.txt). Markdown versions of documentation pages are available by appending `.md` to page URLs; this page is available as [Markdown](https://docs-embed.anyflow.jp/release/embed/tour.md).

# SDK組み込みツアー

## 完成イメージ

トライアルツアーで使用した[ウィザードホスティングのページ](https://anyflow-demo.integrations.jp/)を例として取り上げます。

画面の構成や要件はあくまでも一例です。このページで紹介していないメソッドも[SDKドキュメント](/anyflow-sdk/docs.md)には存在するため、状況に応じて利用してください。

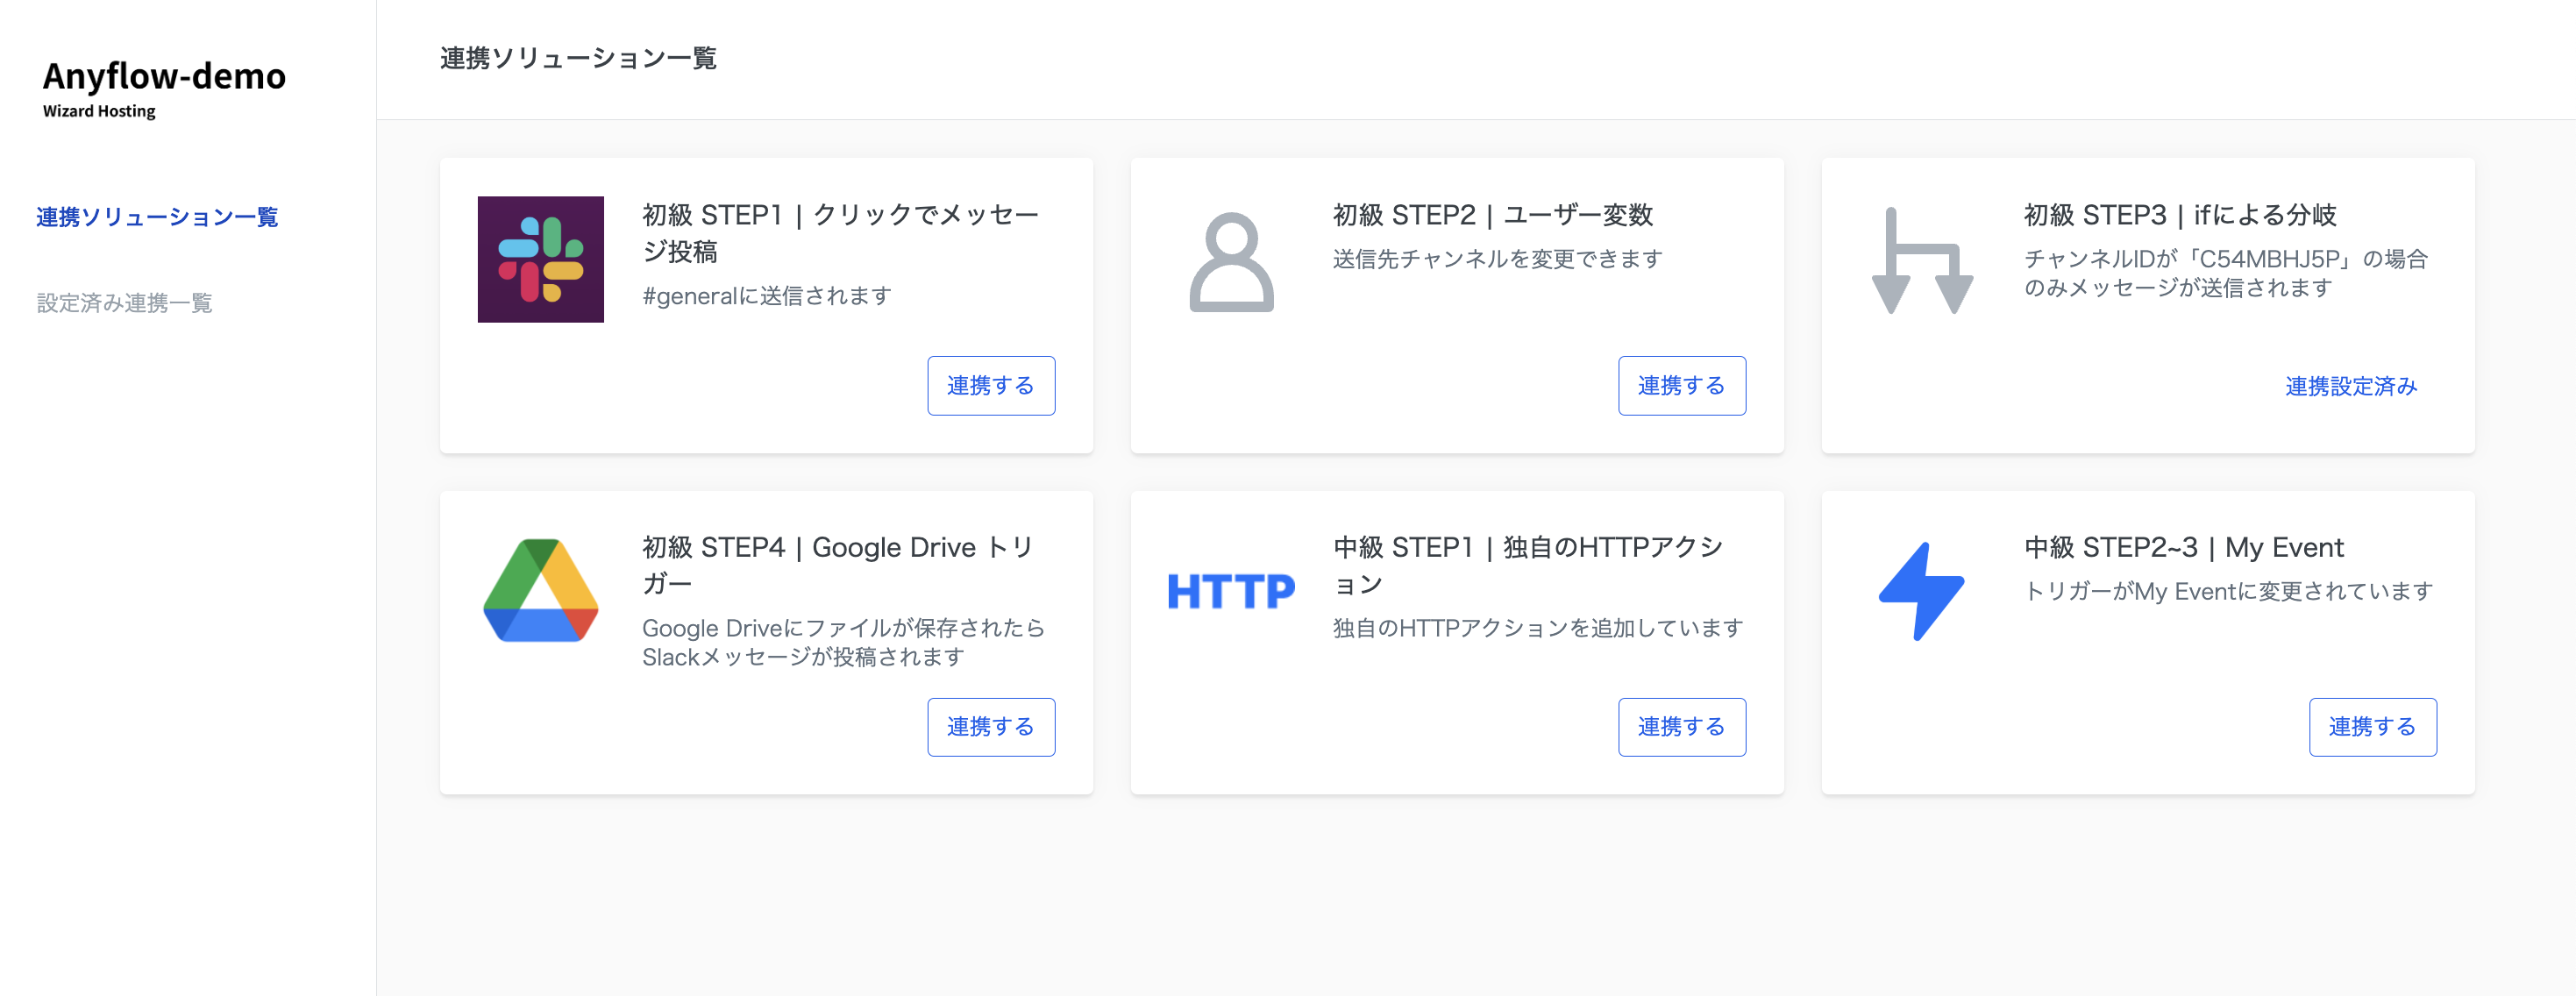
### 連携ソリューション一覧画面（例）

<figure><img src="https://files.readme.io/58683fb58ec5401748e43532254dce487f5d6473f1b61451f35c86b89bed0f09-image.png" alt=""><figcaption></figcaption></figure>

{% hint style="success" %}
**要件**

* 連携ソリューション一覧にはデプロイされたソリューションの一覧が表示される
* 各ソリューションの「連携する」ボタンを押すとウィザードが立ち上がる
* 既に連携を設定済の場合は「連携する」ボタンではなく「連携設定済み」ボタンを表示する
  {% endhint %}

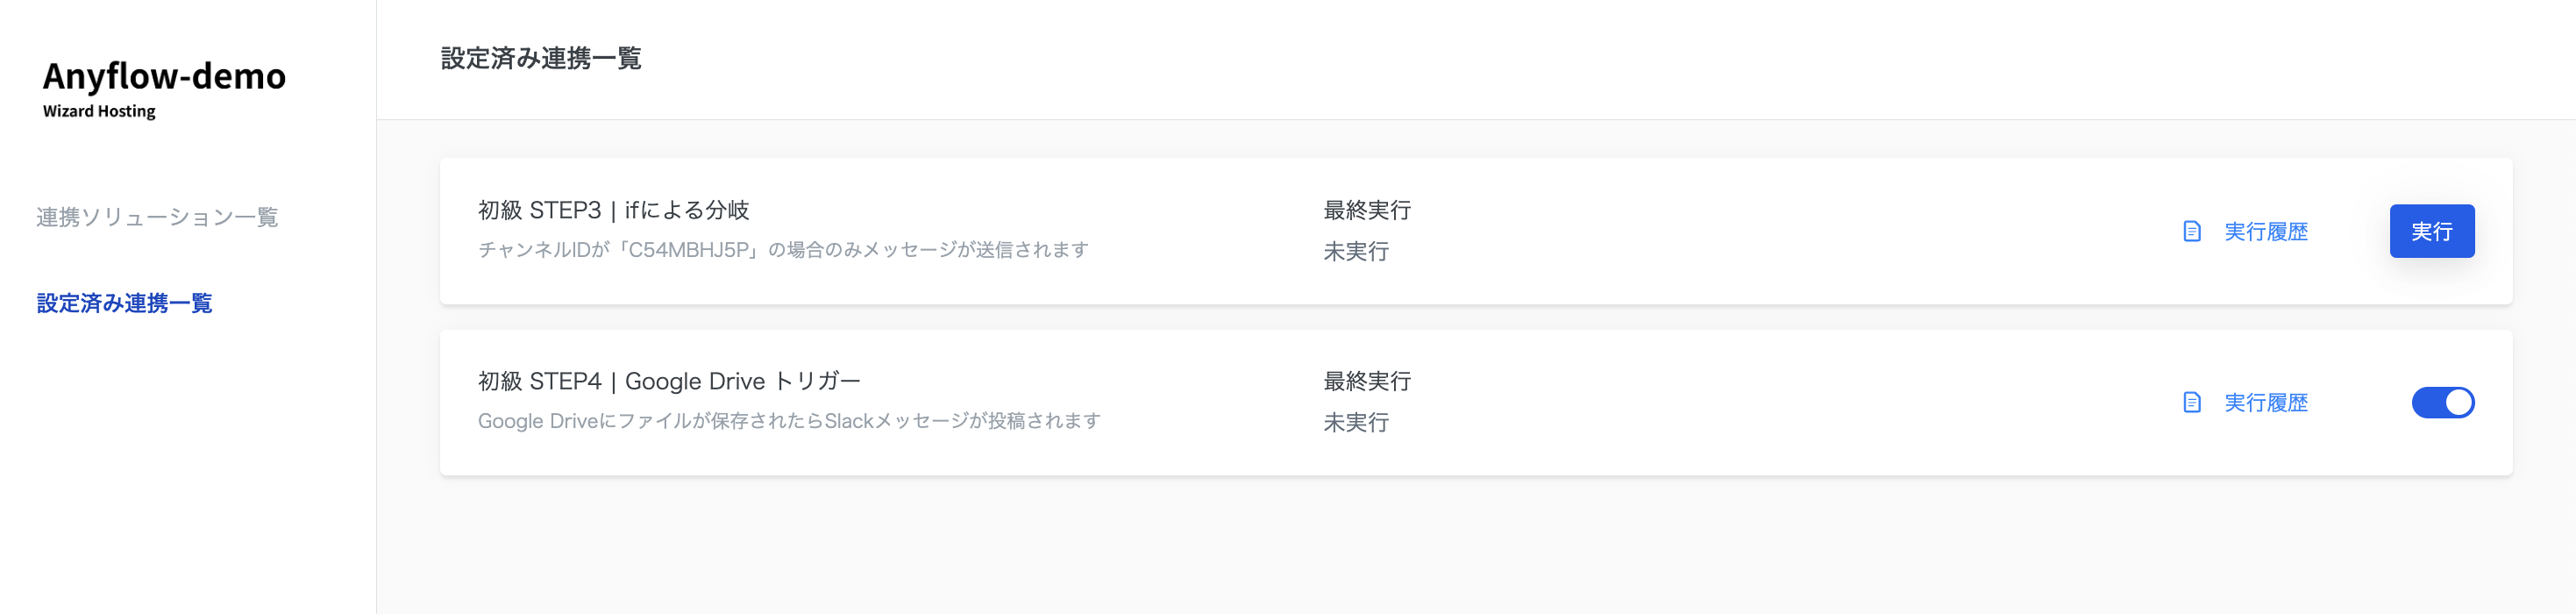
### 設定済み連携一覧画面（例）

<figure><img src="https://files.readme.io/ba91c24ef133307e1cfc93daaf87c5455e83914c50e4b63d2f67392ea313f8cf-image.png" alt=""><figcaption></figcaption></figure>

{% hint style="success" %}
**要件**

* 設定済のソリューションの一覧が表示される
* 最終実行日が表示される
* 「実行履歴」ボタンを押すとそのソリューションの実行履歴を表示できる
* トリガーがClickトリガーまたはMy Eventトリガーの場合は手動実行できる
* ソリューションの有効状態を切り替えられる
  {% endhint %}

以下の手順で、組み込み例を再現することができます。

## 1. 初期設定

### 1-1. インストール

まずは次のコマンドを実行し[SDKをインストール](/anyflow-sdk/docs.md#install-sdk)します。

```sh
npm install @anyflowinc/embed-sdk
```

### 1-2. JWTの生成

step3で使うものです。\
Anyflow Embedでは、[JWT](/release/embed/generate-jwt.md)を使用してベンダープロダクトとデータのやりとりを行います。

{% hint style="success" %}
**JWT生成の大まかなステップ**

1. ウィザードを埋め込むサイトのオリジン（URL）の共有
2. JWTペイロードの内容検討
3. 公開鍵と秘密鍵の生成
4. Anyflow管理画面より公開鍵の登録
5. JWT生成処理の実装
   {% endhint %}

### 1-3. SDKの初期化

step2で作成したJWT生成の関数をSDKの[init関数](/anyflow-sdk/docs.md#init-sdk)に渡すとSDKを初期化できます。

```javascript
const fetchJwt = async () => {
  const res = await fetch("./path/to/your/jwt/endpoint");
  const json = await res.json();
  return json["token"];
};

AnyflowSDK.init(fetchJwt);
```

初期化後は[instance関数](/anyflow-sdk/docs.md#get-sdk-instance)を使いSDKインスタンスを取得します。

```javascript
const sdk = AnyflowSDK.instance;
```

## 2. 連携ソリューション一覧画面の実装

### 2-1. ソリューションの一覧を取得する

<figure><img src="https://files.readme.io/58683fb58ec5401748e43532254dce487f5d6473f1b61451f35c86b89bed0f09-image.png" alt="ソリューション一覧"><figcaption><p>ソリューション一覧</p></figcaption></figure>

ソリューションの一覧情報を取得するにはSDKの[getSolutionメソッド](/anyflow-sdk/docs.md#get-solutions)を使用します。

{% tabs %}
{% tab title="JavaScript" %}

```javascript
// 特定のソリューションの情報のみ取得する
const solution = await sdk.getSolution("solution_id");

// リストで取得する
const solutions = await sdk.getSolutions();
```

{% endtab %}

{% tab title="TypeScript" %}

```typescript
// 特定のソリューションの情報のみ取得する
const solution: Solution = await sdk.getSolution("solution_id");

// リストで取得する
const solutions: Solution[] = await sdk.getSolutions();
```

{% endtab %}
{% endtabs %}

以下の様な情報を取得できます。

```json
[{
    "id": "string",
    "name": "string",
    "description": "string",
    "state": "string",
    "runnable": "boolean",
    "thumbnail_url": "string",
    "created_at": "string (ISO 8601 format)",
    "updated_at": "string (ISO 8601 format)",
    "latestJob": {},
}]
```

### 2-2. ソリューションのインストール状態を取得する<br>

<figure><img src="https://files.readme.io/ce85e0cbdba7ee5d6cf9c1b643a0fe68dd03ba9653a997c6d1fa4124fa93c009-image.png" alt="左：インストール前　右：インストール後" width="600"><figcaption><p>左：インストール前　右：インストール後</p></figcaption></figure>

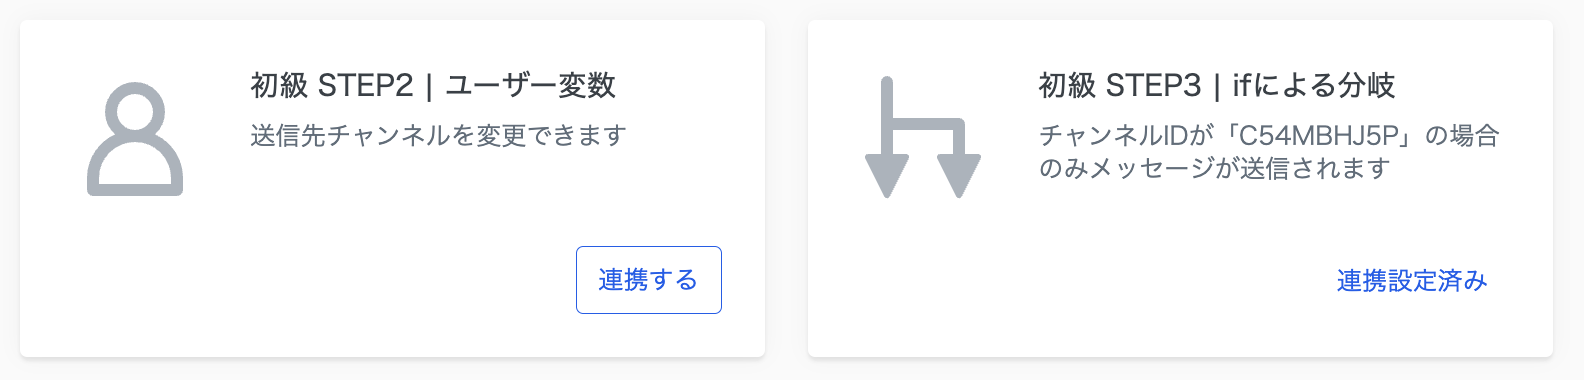
ソリューションがインストール済みかどうかは Solutionオブジェクトの [stateプロパティ](/anyflow-sdk/docs.md#get-solution-state)から取得できます。（[SDKドキュメント](https://anyflow-sdk.readme.io/docs/getting-started#%E3%82%BD%E3%83%AA%E3%83%A5%E3%83%BC%E3%82%B7%E3%83%A7%E3%83%B3%E3%81%AE%E7%8A%B6%E6%85%8B%E3%82%92%E7%A2%BA%E8%AA%8D%E3%81%99%E3%82%8B)）

{% tabs %}
{% tab title="JavaScript" %}

```javascript
const state = solution.state;
```

{% endtab %}

{% tab title="TypeScript" %}

```typescript
const state: SolutionState = solution.state;
```

{% endtab %}
{% endtabs %}

<table><thead><tr><th width="144.1875">state</th><th>説明</th></tr></thead><tbody><tr><td>not_installed</td><td>まだソリューションがインストールされていません。</td></tr><tr><td>enabled</td><td>ソリューションが有効です。</td></tr><tr><td>disabled</td><td>ソリューションはインストールされていますが、有効にされていません。</td></tr></tbody></table>

今回の例では、not\_installed の場合はインストール前と判断し、UIでは「連携する」ボタンを表示します。

enabled と disabled の場合はインストール後と判断し、UIでは「連携設定済み」ボタンを表示します。

### 2-3. ボタンを押したらウィザードを立ち上げる<br>

<figure><img src="https://files.readme.io/365d827b1d7521007addf1bb1321bbb32c8db4db1b56c4fb9c40b0d60837c95a-image.png" alt="ウィザード" width="400"><figcaption><p>ウィザード</p></figcaption></figure>

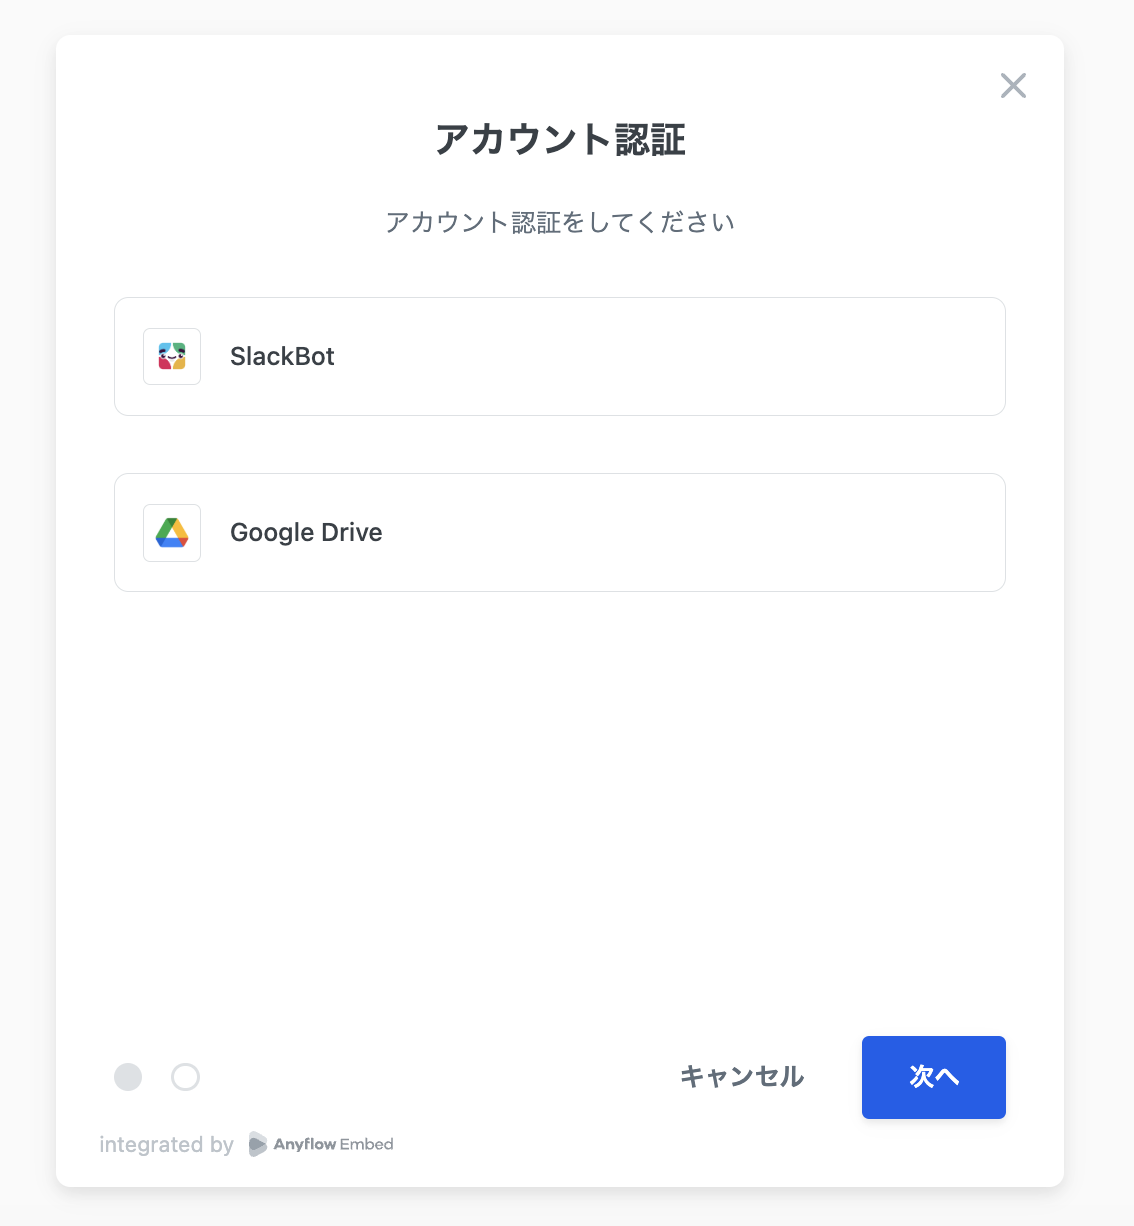
連携ボタンを押したとき、認証や連携の設定を行う「ウィザード」を立ち上げるには[createWizard メソッド](/anyflow-sdk/docs.md#create-wizard)を使用しウィザードのインスタンスを生成したうえで、そこに[loadメソッド](/anyflow-sdk/docs.md#load-wizard)で指定のソリューションを読み込みます。

{% tabs %}
{% tab title="JavaScript" %}

```javascript
const iframe = document.getElementById("solution_wizard");
const solutionWizard = sdk.createWizard(iframe);
solutionWizard.load("your_solution_id");
```

{% endtab %}

{% tab title="TypeScript" %}

```typescript
const iframe = document.getElementById("solution_wizard");
const solutionWizard: SolutionWizard = sdk.createWizard(iframe);
solutionWizard.load("your_solution_id");
```

{% endtab %}
{% endtabs %}

## 3. 設定済み連携一覧画面の実装

### 3-1. 設定済み連携の一覧を取得する

<figure><img src="https://files.readme.io/ba91c24ef133307e1cfc93daaf87c5455e83914c50e4b63d2f67392ea313f8cf-image.png" alt="設定済み連携一覧"><figcaption><p>設定済み連携一覧</p></figcaption></figure>

設定済みの連携一覧は、step 2-1, 2-2と同様に`getSolution`メソッドを使い、stateプロパティが enabled または disabled のソリューションのみを抽出することで得られます。

<figure><img src="https://files.readme.io/0911f83c1e6542d5a281e0f4f9176089b71409080b8d864b0c3915071332625d-image.png" alt=""><figcaption></figcaption></figure>

`getSolution`メソッドで得られたSolutionオブジェクトの`latestJob`プロパティから最終実行日時の情報にアクセスできます。

```json
[{
    "id": "string",
    "name": "string",
    "description": "string",
    "state": "string",
    "runnable": "boolean",
    "thumbnail_url": "string",
    "created_at": "string (ISO 8601 format)",
    "updated_at": "string (ISO 8601 format)",
    "latestJob": {
        "id": "string",
        "state": "string",
        "archived": "boolean",
        "logs": ["array of strings"],
        "startedAt": "string (ISO 8601 format)",
        "finishedAt": "string (ISO 8601 format)"
    },
}]
```

<figure><img src="https://files.readme.io/b385d5e30fc31c80283a0c6faccb615200714b843cba78aaa32eacfd64e1572f-image.png" alt=""><figcaption></figcaption></figure>

### 3-3. 手動実行の場合に実行ボタンを表示する

`getSolution`メソッドで得られたSolutionオブジェクトの`runnable`がTrueの場合、そのソリューションは手動実行することが可能です。

必要に応じて実行ボタンを表示してください。（[Clickトリガー](/solution-editor/triggers/outgoing/click-triggers.md)または[My Eventトリガー](/solution-editor/triggers/outgoing/my-event.md)の場合、手動実行が可能です）

Clickトリガーの場合、ソリューションを実行するには SDK の [runSolutionメソッド](/anyflow-sdk/docs.md#run-solution)を実行します。

```javascript
const job = await sdk.runSolution("your_solution_id");
```

My Eventトリガーの場合、ソリューションを手動実行するには SDK の [sendMyEventメソッド](/anyflow-sdk/docs.md#send-my-event)を実行します。

<figure><img src="https://files.readme.io/2f3ce390a88859994d649fea1fb5b7516f275f594fffa90f961118262970559f-image.png" alt=""><figcaption></figcaption></figure>

### 3-4. ソリューションの有効状態を切り替える

ソリューションを有効/無効を切り替えるには sdk の[enableSolution/disableSolutionメソッド](/anyflow-sdk/docs.md#enable-solution)を、無効にするには`disableSolution`ソッドを実行します。

```javascript
// 有効にする
await sdk.enableSolution("your_solution_id");

// 無効にする
await sdk.disableSolution("your_solution_id");
```

&#x20;

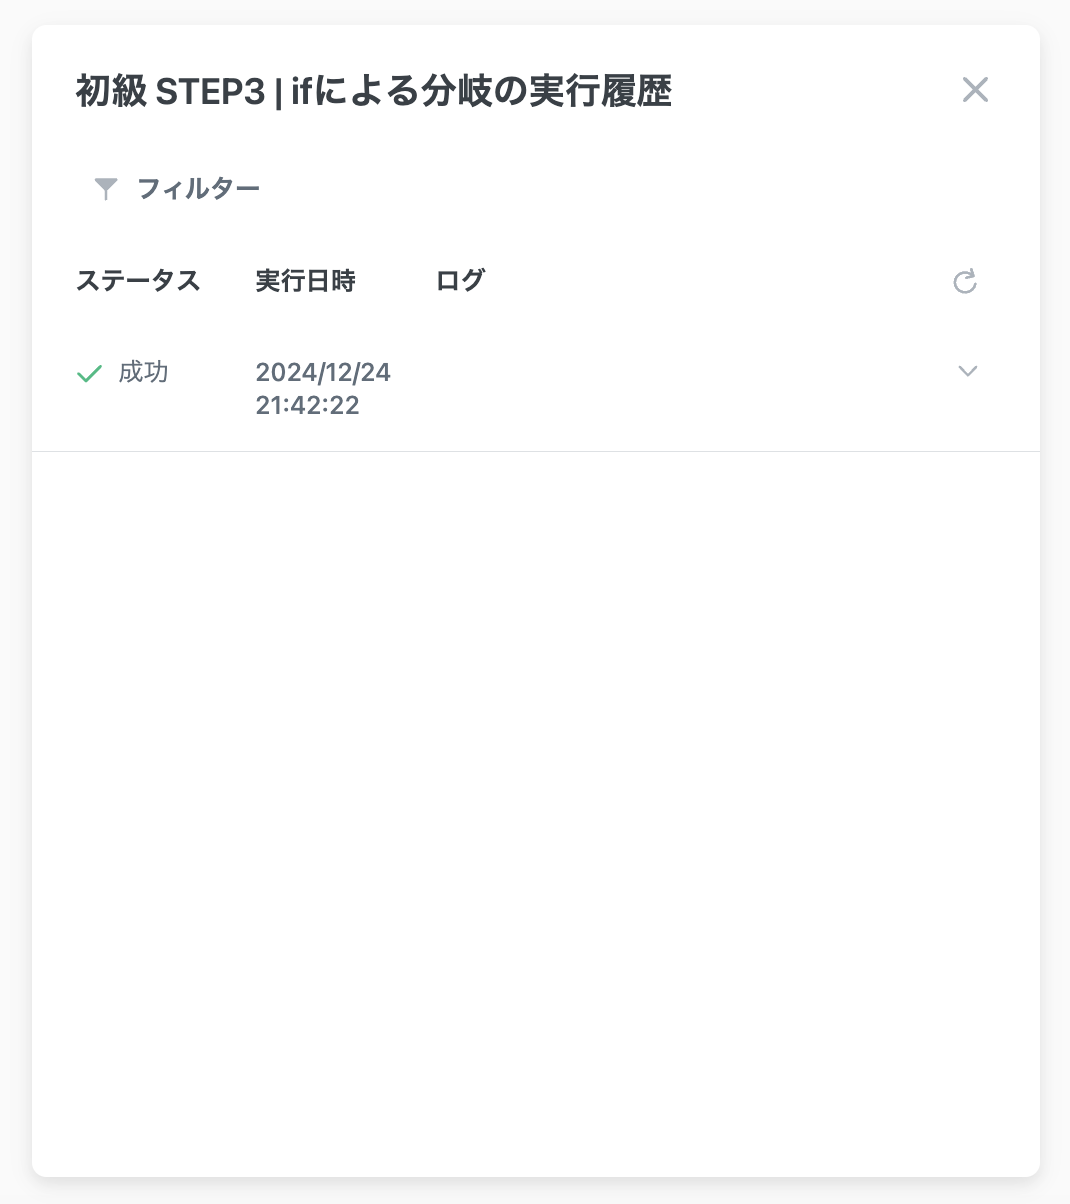
### 3-5. 実行履歴を表示する

<figure><img src="https://files.readme.io/d92180e5a77120e8773d6dc29758c67984316a942e01bfb6fc9fda2adbf5f68d-image.png" alt=""><figcaption></figcaption></figure>

<figure><img src="https://files.readme.io/02379678278151cecbc3f00eb642d2269fb967ddae0b4debcb98d574a4cd1a5b-image.png" alt="" width="375"><figcaption></figcaption></figure>

`SolutionWizard` オブジェクトの `loadHistory` メソッドを使用します。 `loadHistory` メソッドには実行履歴を確認したいソリューションの ID を指定します。（[SDKドキュメント](https://anyflow-sdk.readme.io/docs/getting-started#%E3%82%BD%E3%83%AA%E3%83%A5%E3%83%BC%E3%82%B7%E3%83%A7%E3%83%B3%E3%81%AE%E5%AE%9F%E8%A1%8C%E5%B1%A5%E6%AD%B4%E3%82%92%E8%A1%A8%E7%A4%BA%E3%81%99%E3%82%8B)）

```javascript
solutionWizard.loadHistory("your_solution_id");
```

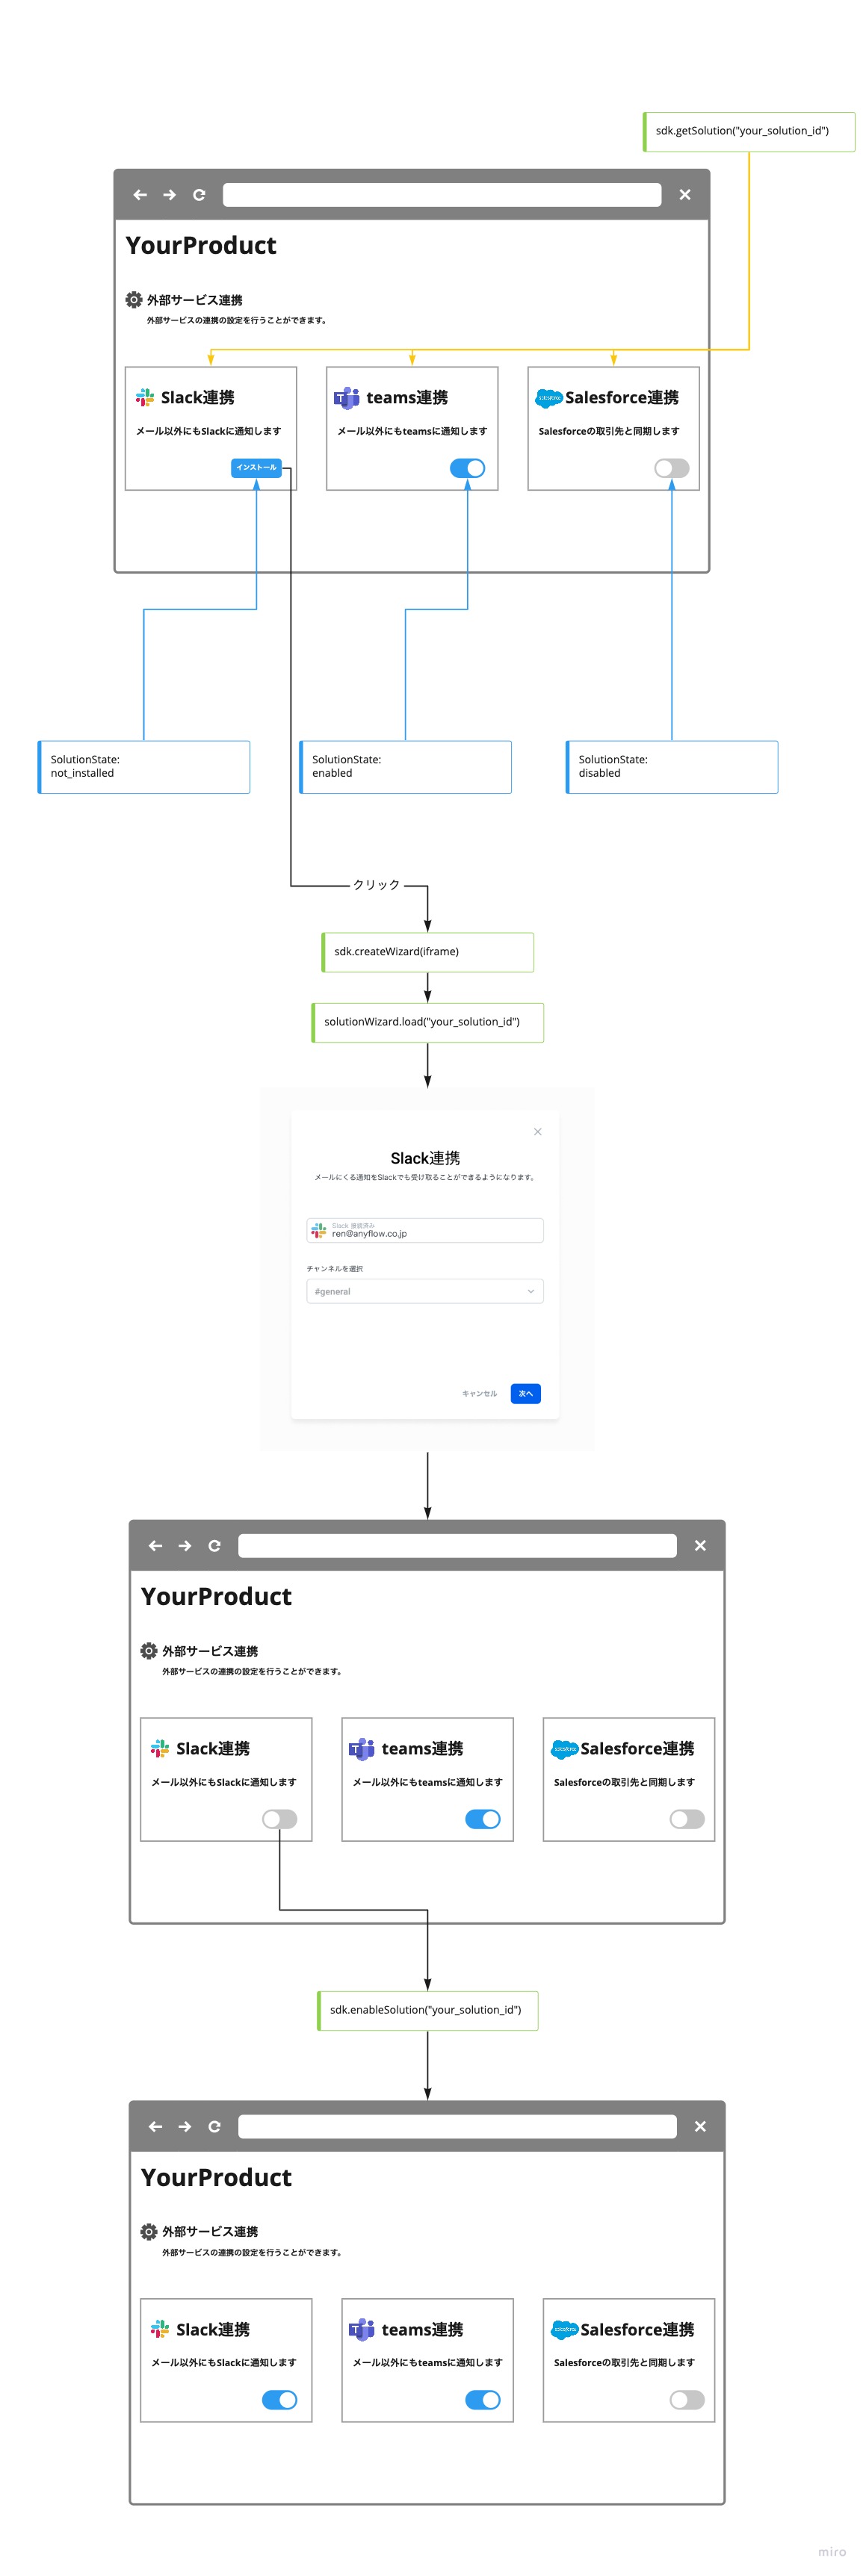
## 参考：SDKメソッドと画面要素の関係

<figure><img src="https://files.readme.io/d72ad57-diagram.jpeg" alt="1159" width="4000%"><figcaption><p>SDKメソッドと画面要素の関係</p></figcaption></figure>


---

# Agent Instructions
This documentation is published with GitBook. GitBook is the documentation platform designed so that both humans and AI agents can read, navigate, and reason over technical content effectively. Learn more at gitbook.com.

## Querying This Documentation
If you need additional information that is not directly available in this page, you can query the documentation dynamically by asking a question.

Perform an HTTP GET request on the current page URL with the `ask` query parameter, and the optional `goal` query parameter:

```
GET https://docs-embed.anyflow.jp/release/embed/tour.md?ask=<question>&goal=<endgoal>
```

`ask` is the immediate question: it should be specific, self-contained, and written in natural language.
`goal` is optional and describes the broader end goal you are ultimately trying to accomplish on behalf of the user. GitBook uses it to tailor the answer towards what is most useful for that goal.

The response will contain a direct answer to the question and relevant excerpts and sources from the documentation.

Use this mechanism when the answer is not explicitly present in the current page, you need clarification or additional context, or you want to retrieve related documentation sections.