> For the complete documentation index, see [llms.txt](https://docs-embed.anyflow.jp/llms.txt). Markdown versions of documentation pages are available by appending `.md` to page URLs; this page is available as [Markdown](https://docs-embed.anyflow.jp/recipe/groupware/custom-oauth-google-drive.md).
# Google DriveのOAuthアプリを作成する
このセクションでは、Google DriveのOAuthアプリを作成する例をご紹介します。\
必要に応じて[公式ドキュメント](https://support.google.com/cloud/answer/10311615)もご参照ください。
## 手順
### 1. 使用するサービスのAPIを有効にする
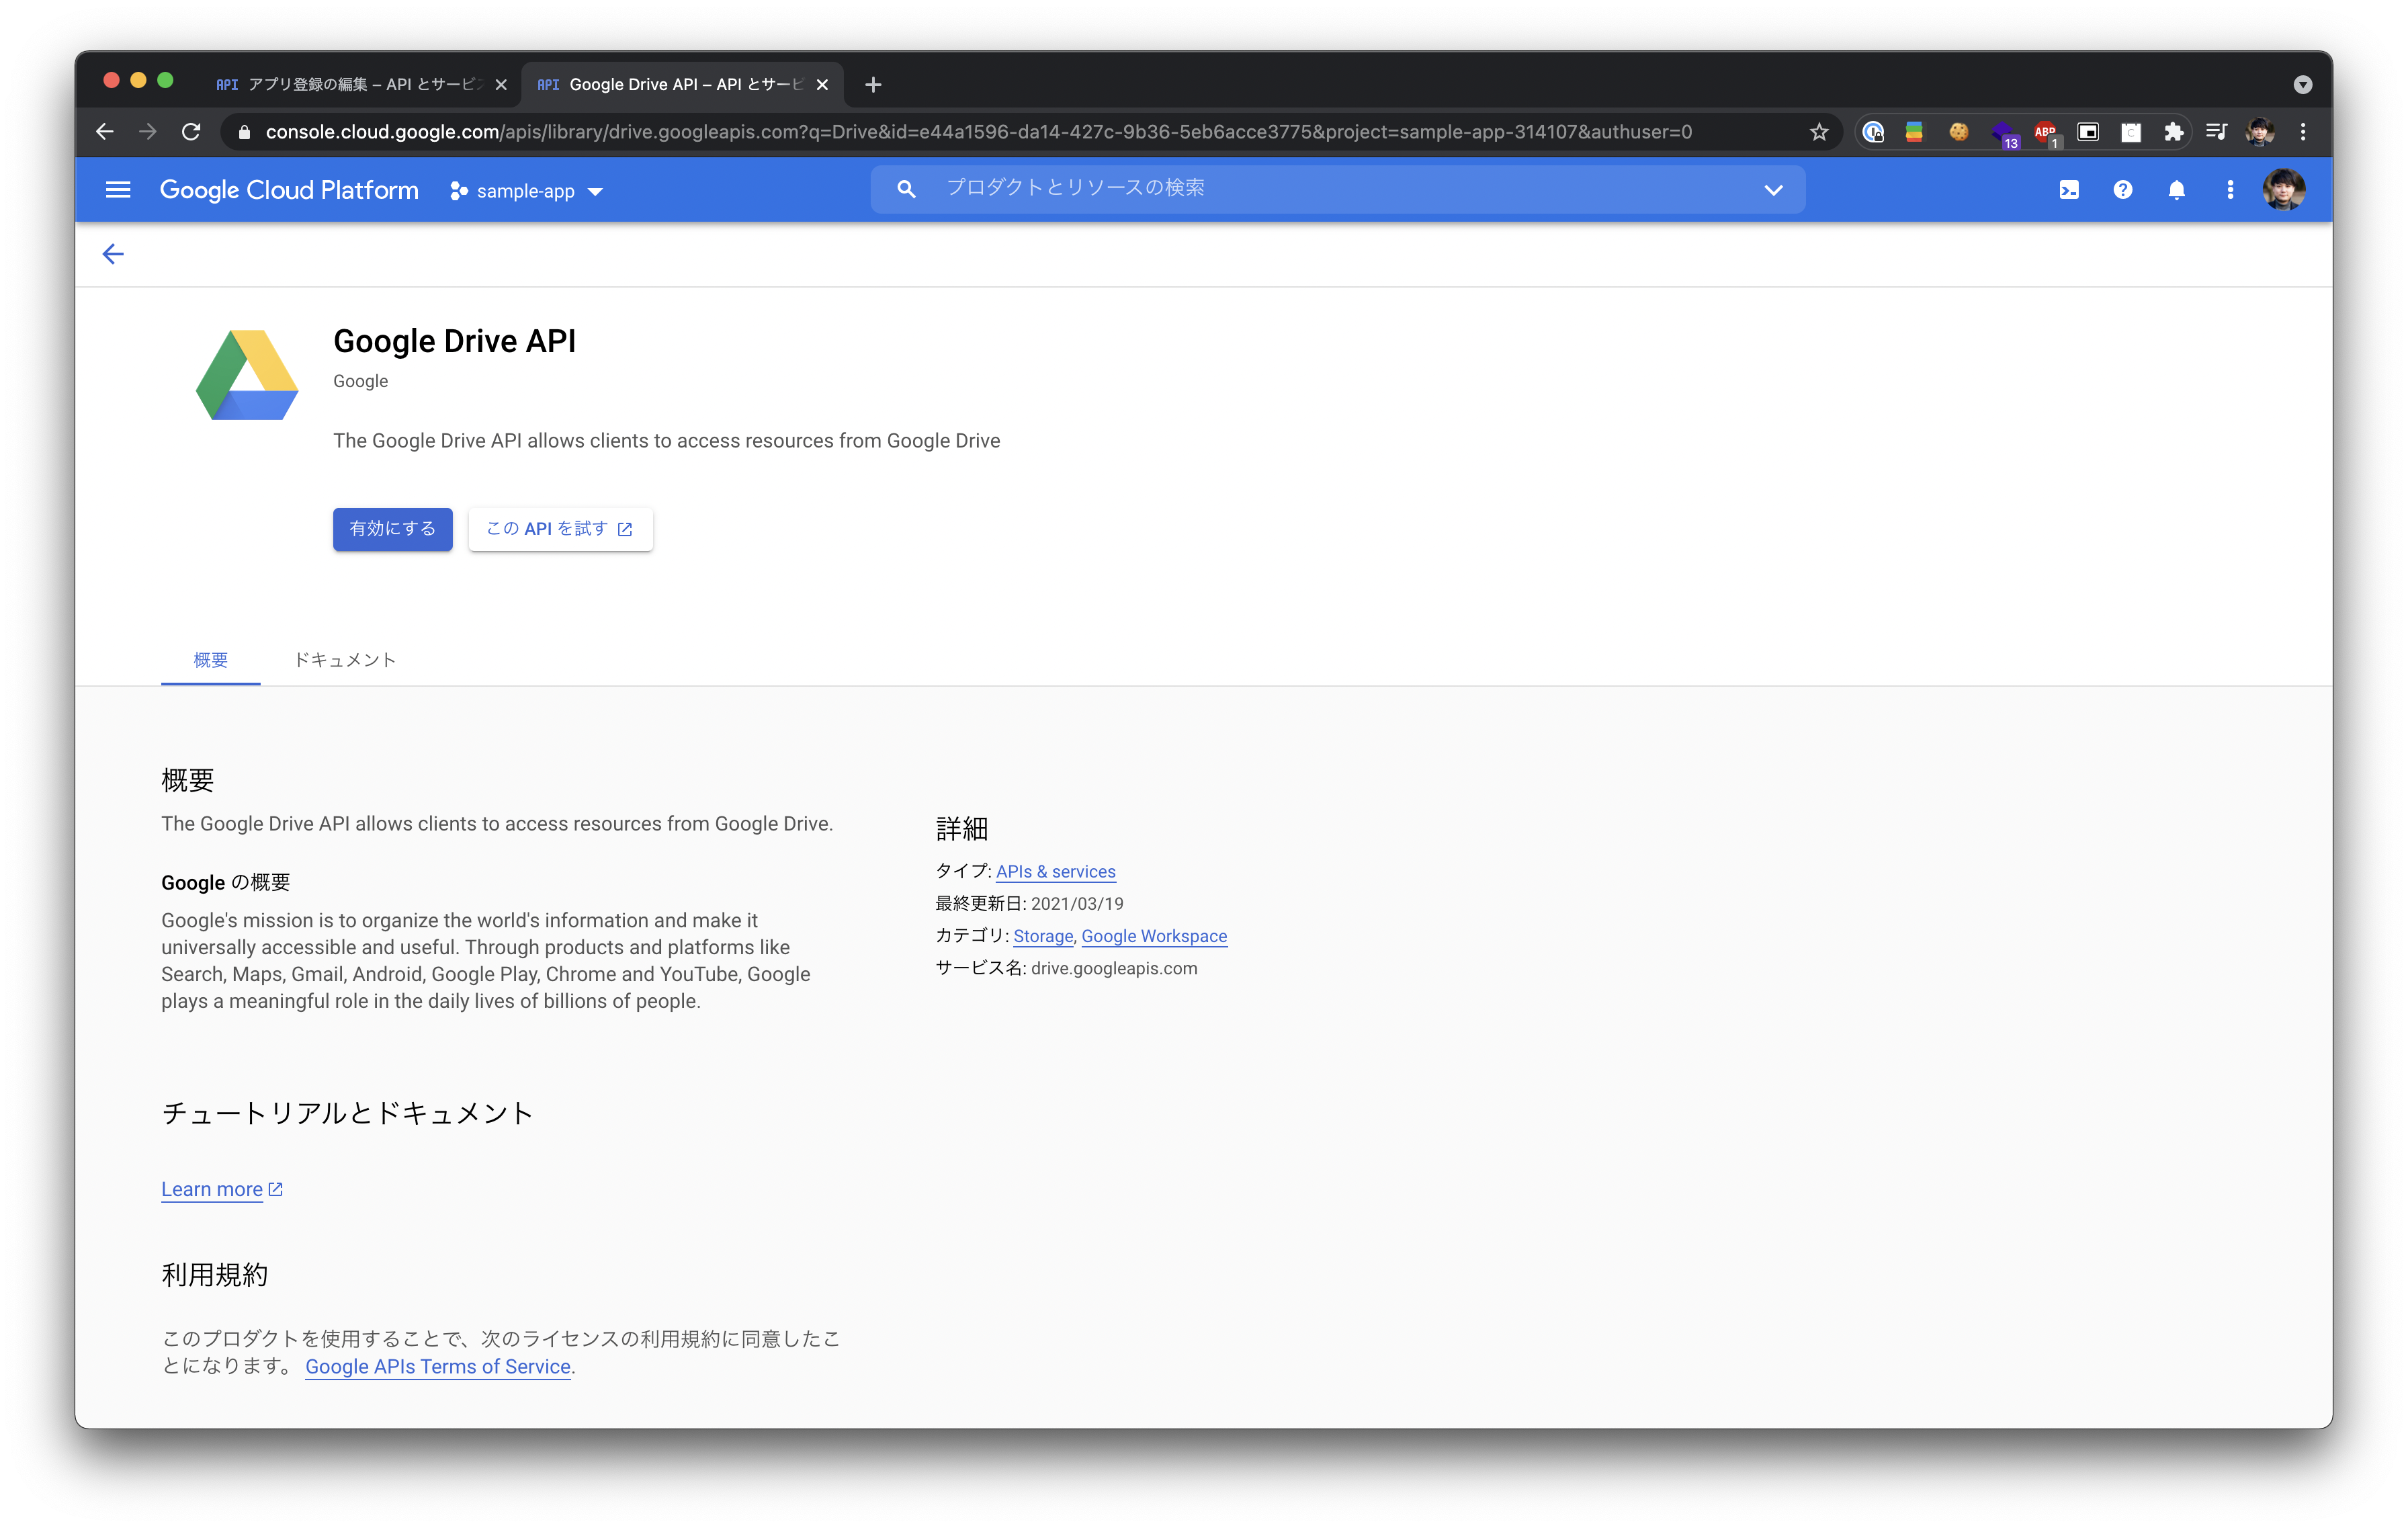
[APIライブラリ](https://console.cloud.google.com/apis/library)から、ソリューションで使われるサービスのAPIを有効にします。
例えば、Google Driveを利用するソリューションの場合、APIライブラリからGoogle Driveを検索し、上記のページから「有効にする」ボタンを押下します。
APIライブラリから、サービスのAPIを有効にすると、OAuth同意画面のスコープ設定でサービスのスコープを選択できます。
### 2. Google Cloud Platform の OAuth同意画面
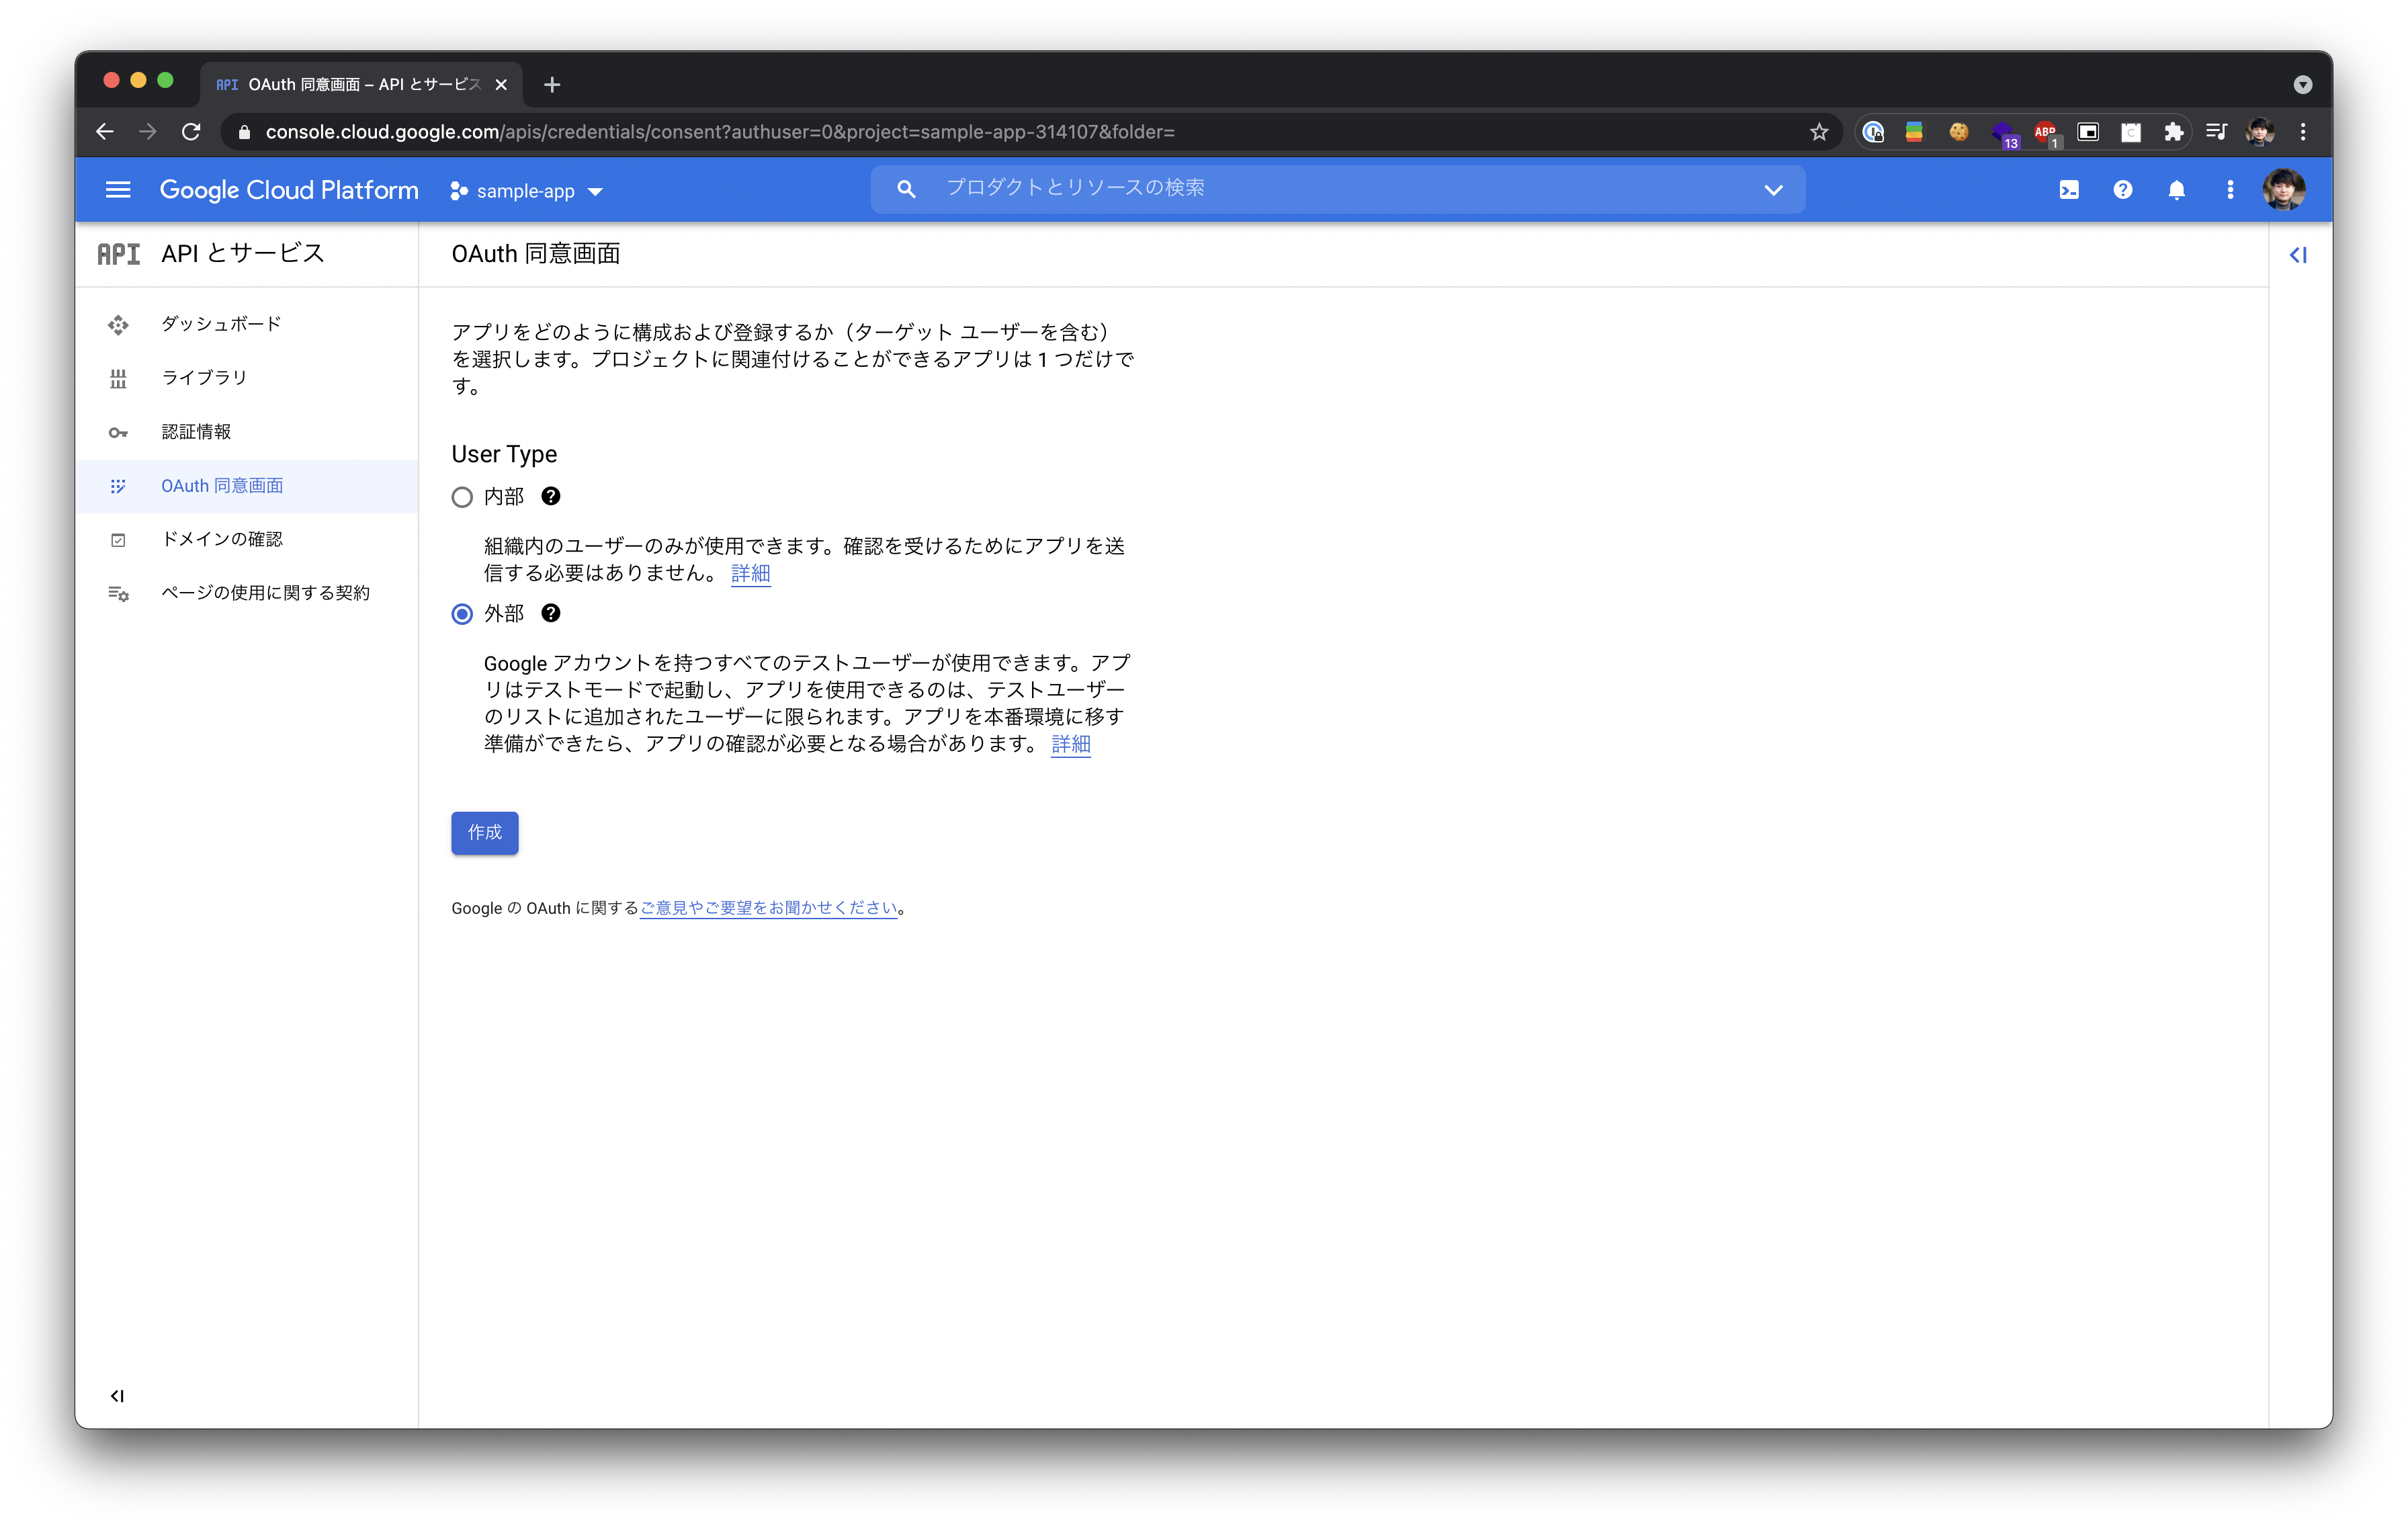
[OAuth 同意画面](https://console.cloud.google.com/apis/credentials/consent)にアクセスします。
「外部」にチェックを入れ、作成します。
### 3. アプリの編集
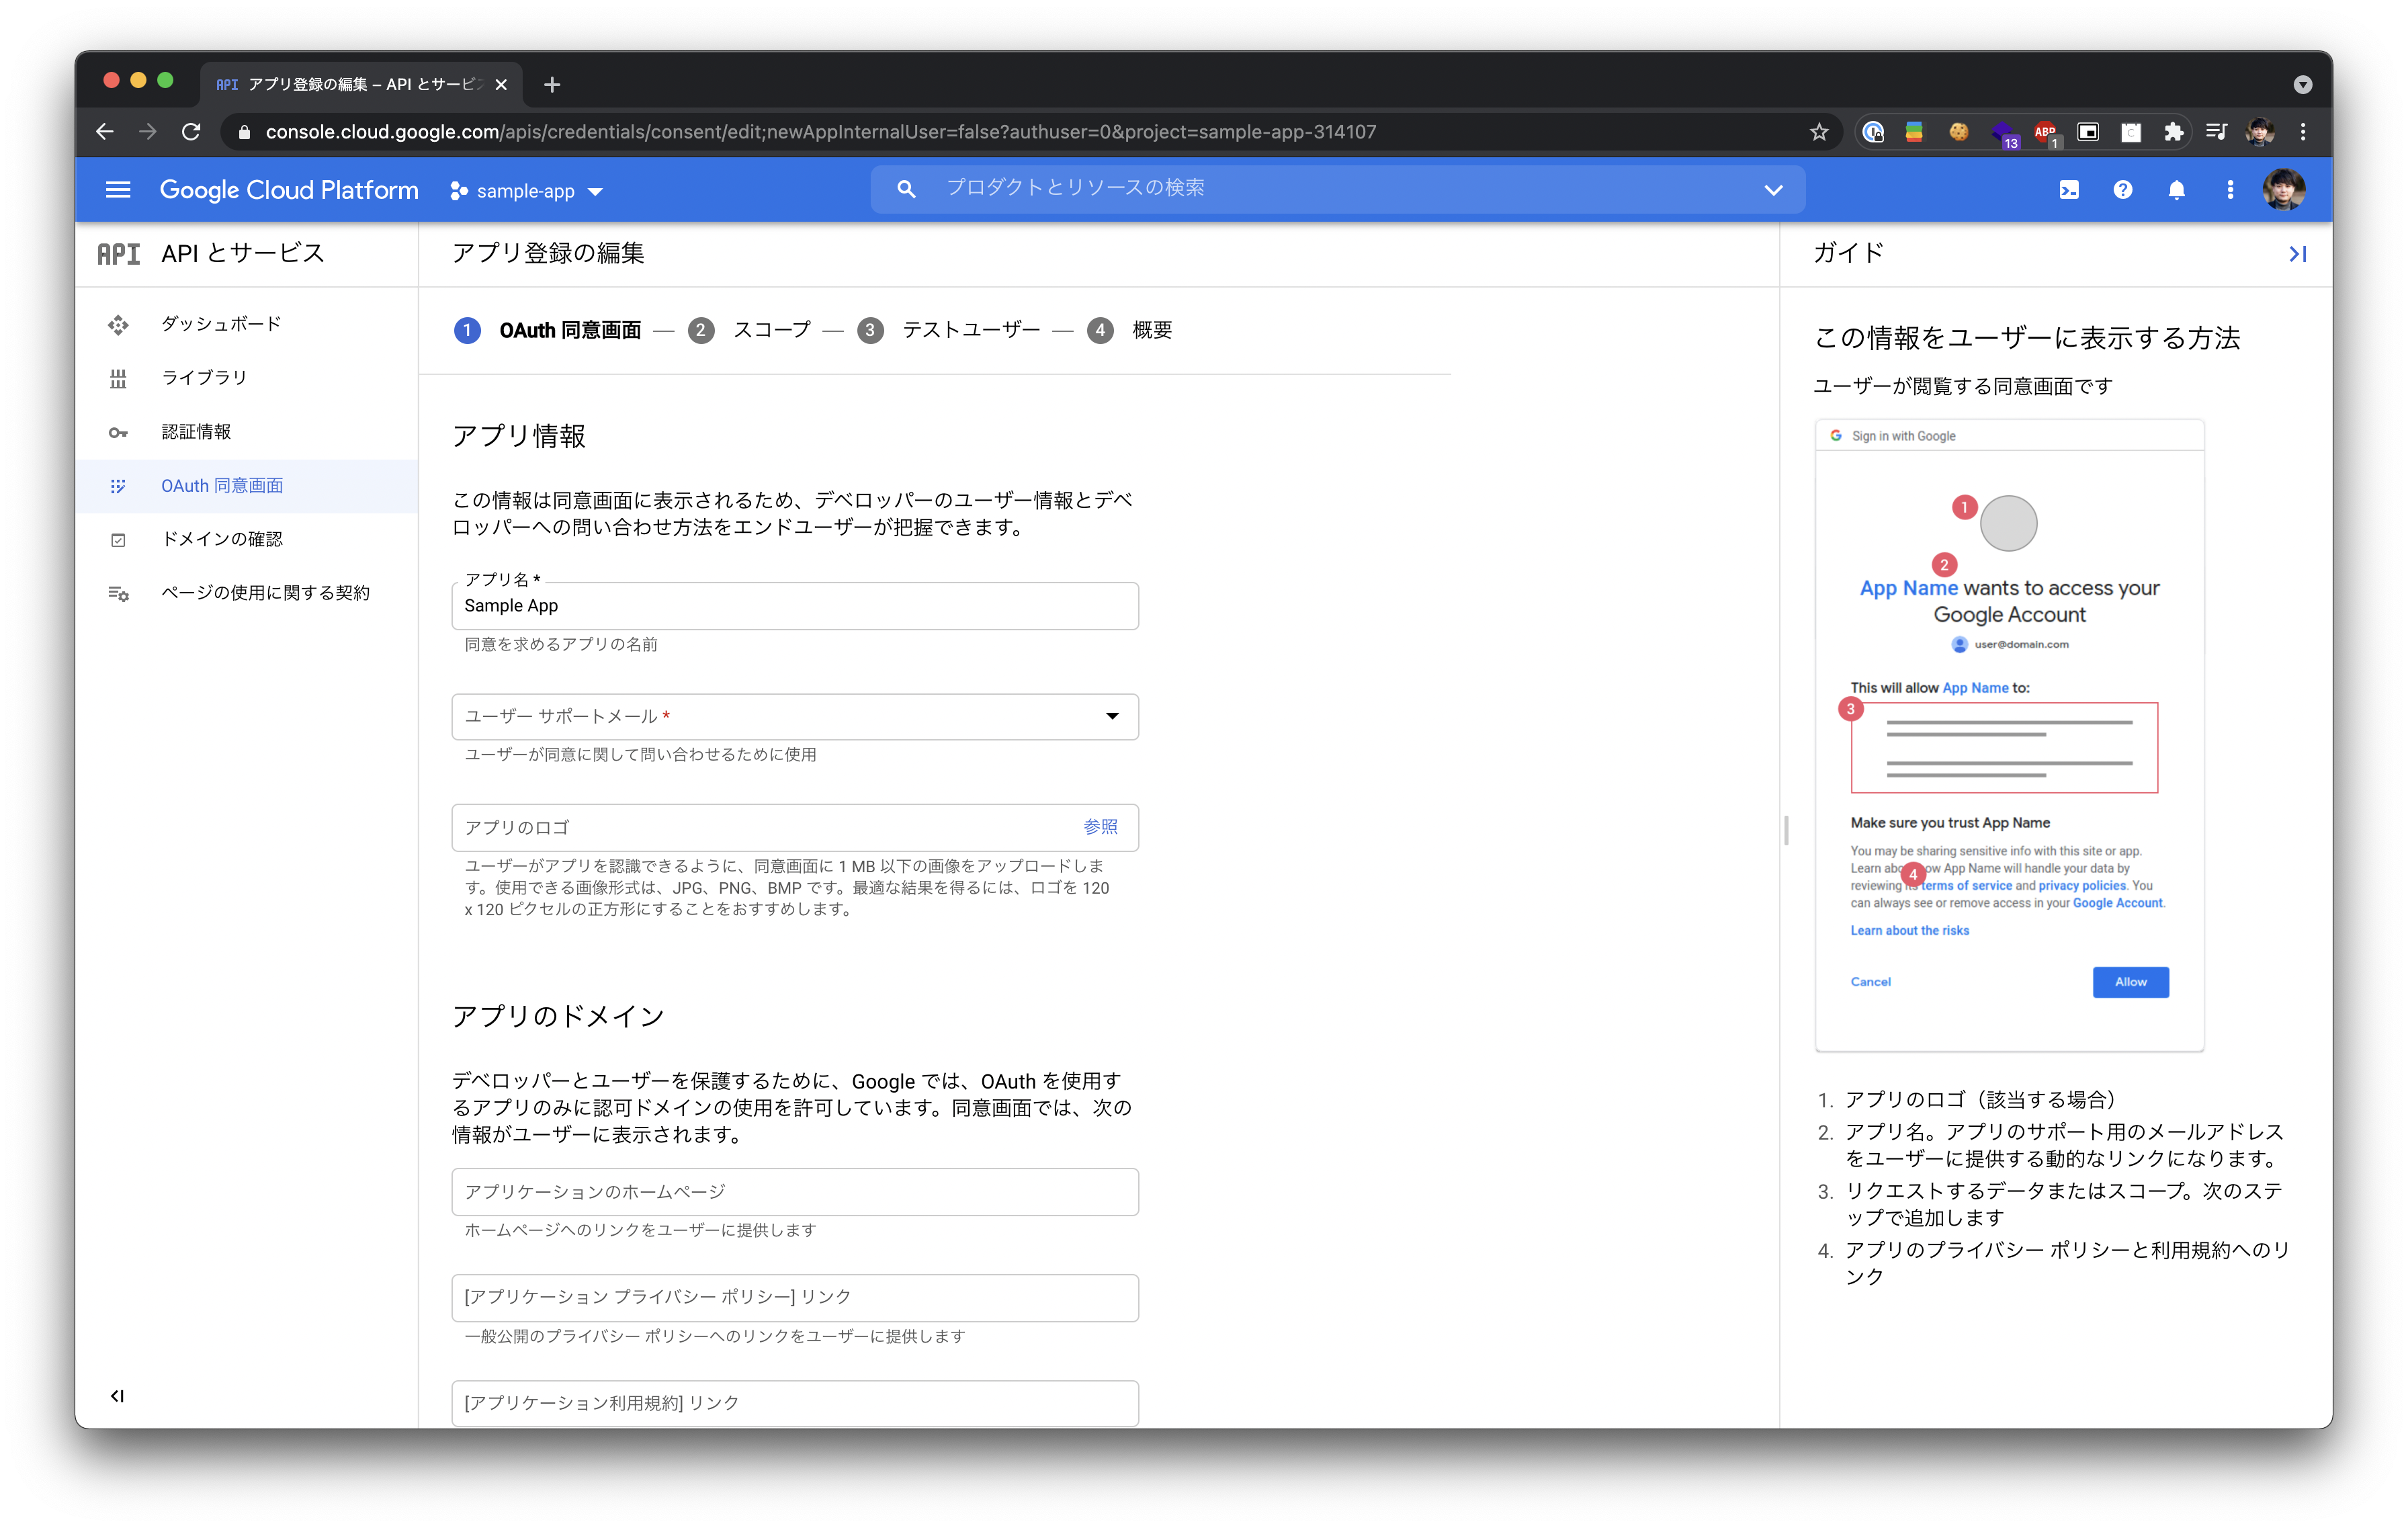
認証画面に表示されるアプリ名や、ロゴ、ドメインの設定をします。\
設定後、「保存して次へ」ボタンを押下します。
### 4. スコープの設定
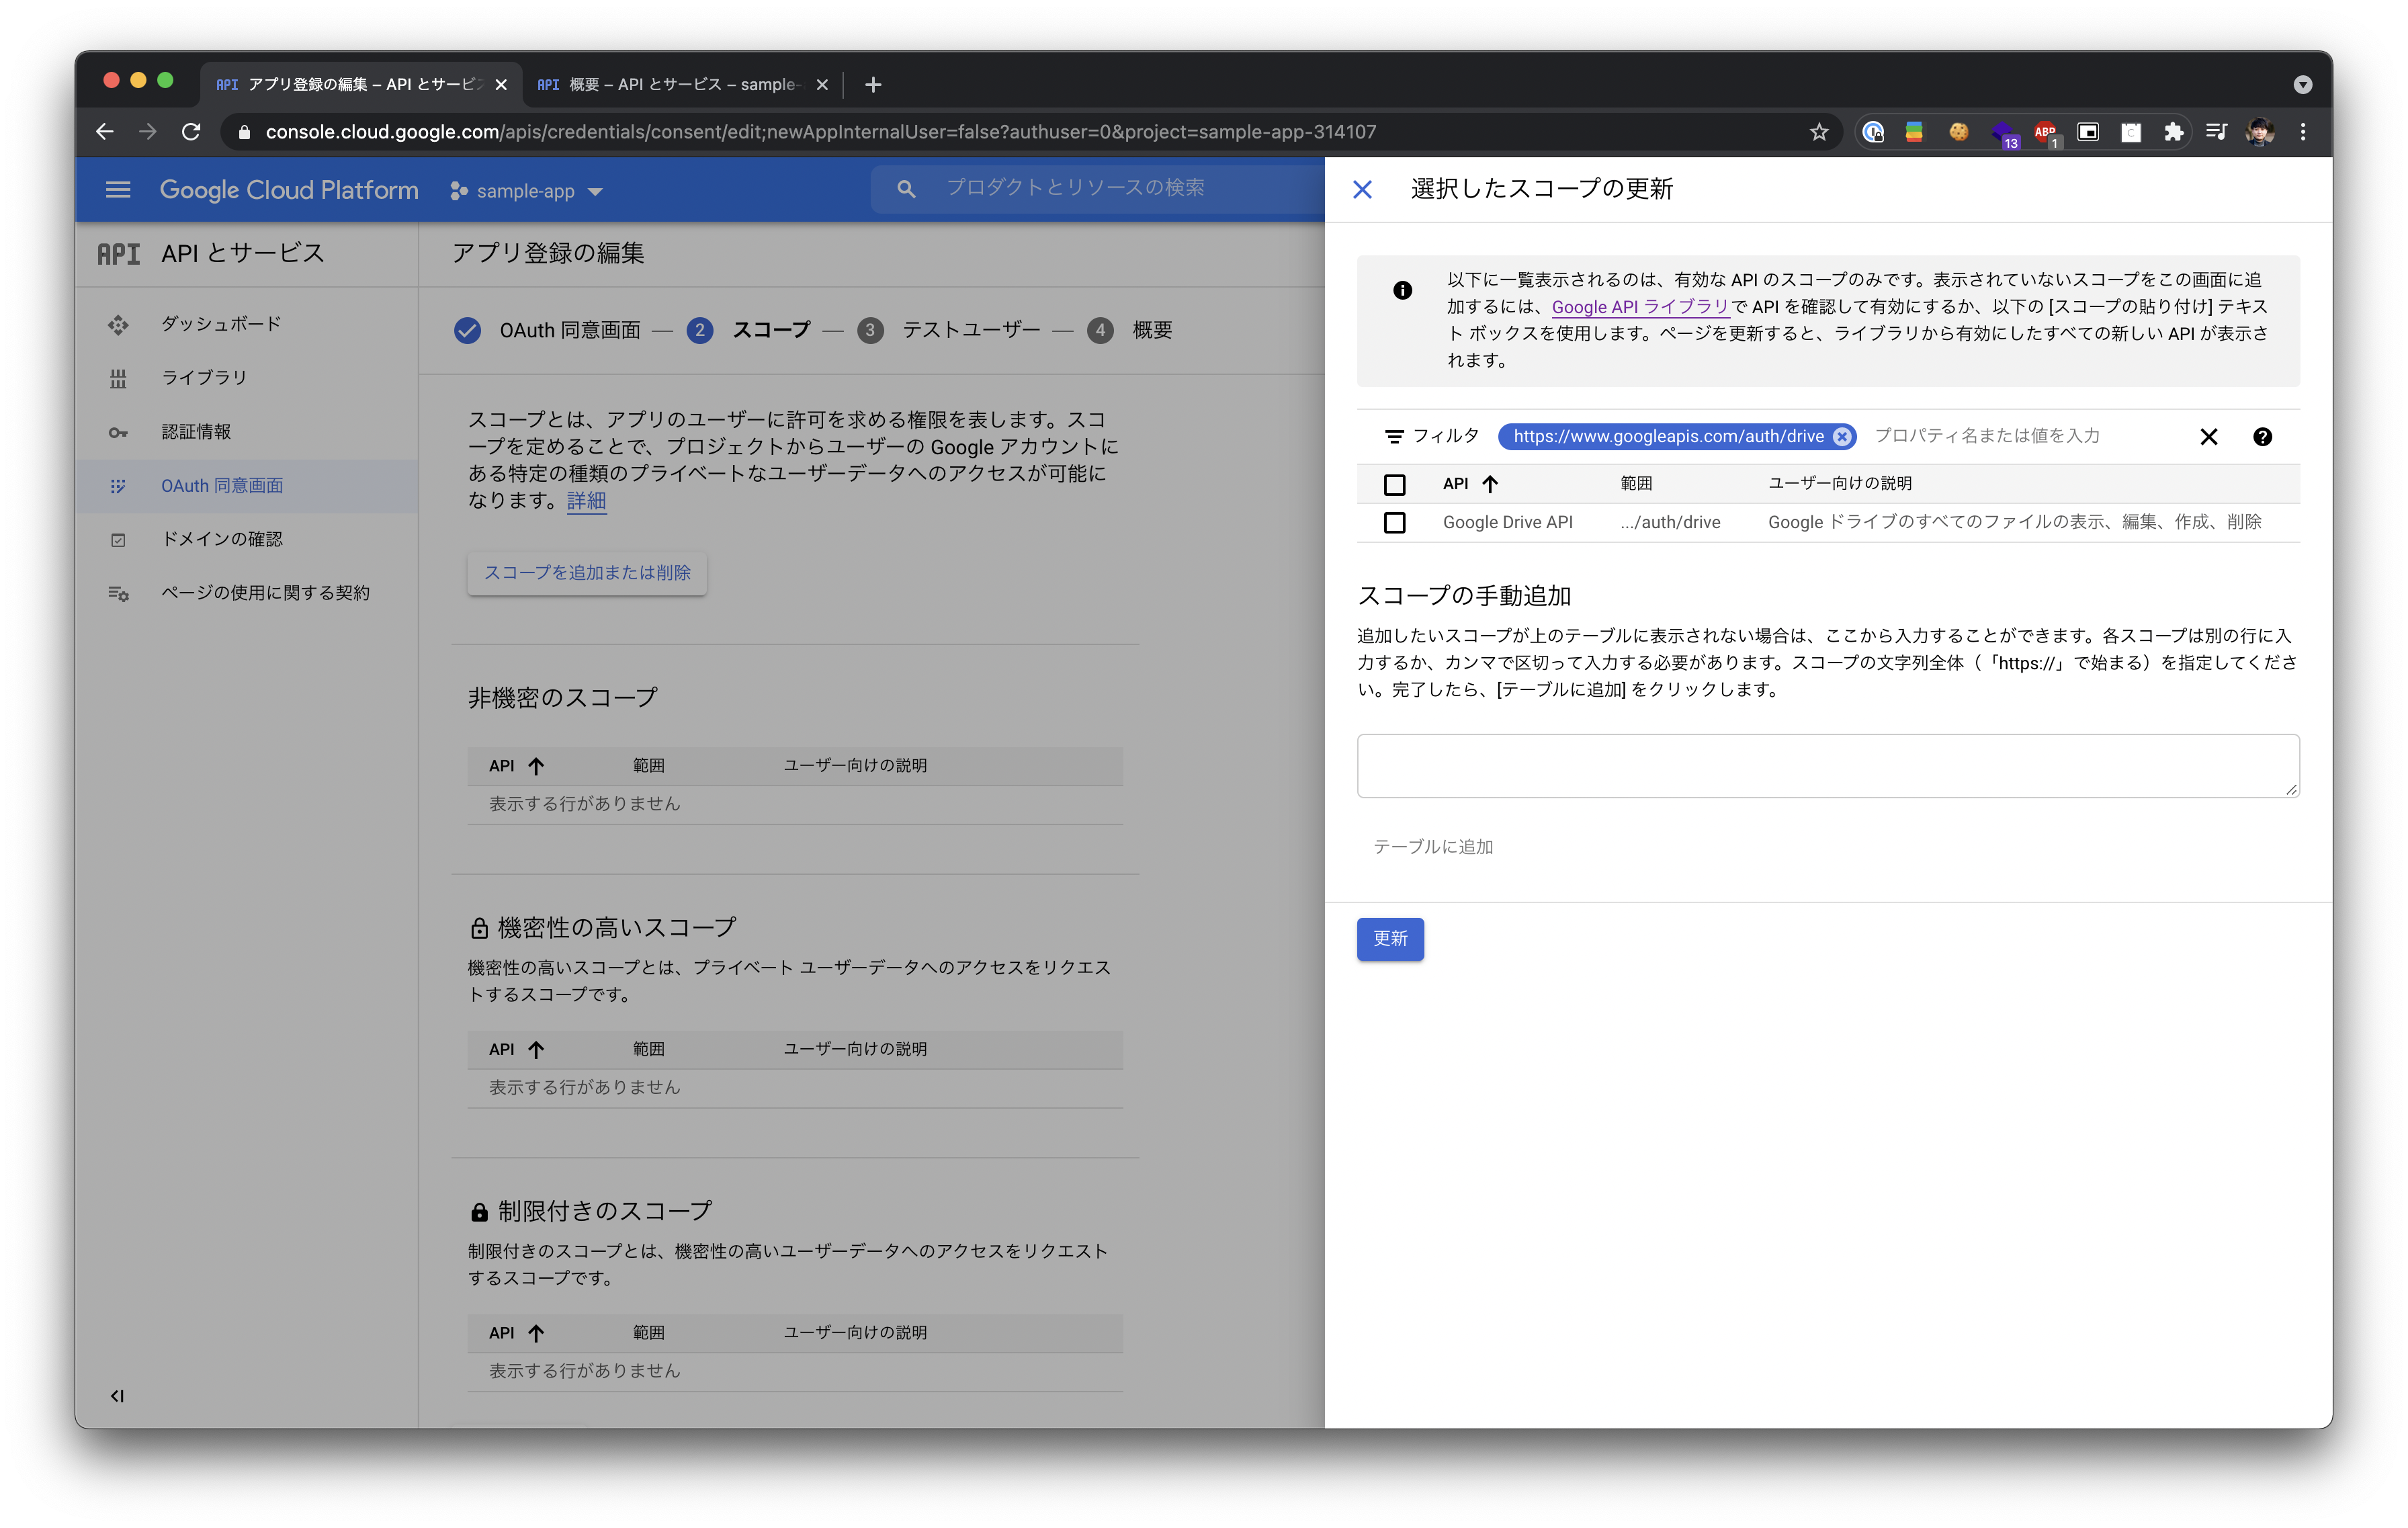
スコープ設定画面の「スコープを追加または削除」ボタンを押下すると以下のような画面が表示されます。
表示されたサイドバーの「フィルタ」に 「Google Drive」と入力すると、Google Driveにまつわるスコープが表示されます。\
このスコープの中から、ソリューションの実行に必要なスコープを選択し、「更新」ボタンを押下します。
スコープ追加後、「保存して次へ」ボタンを押下します。
### 5. テストユーザーを追加
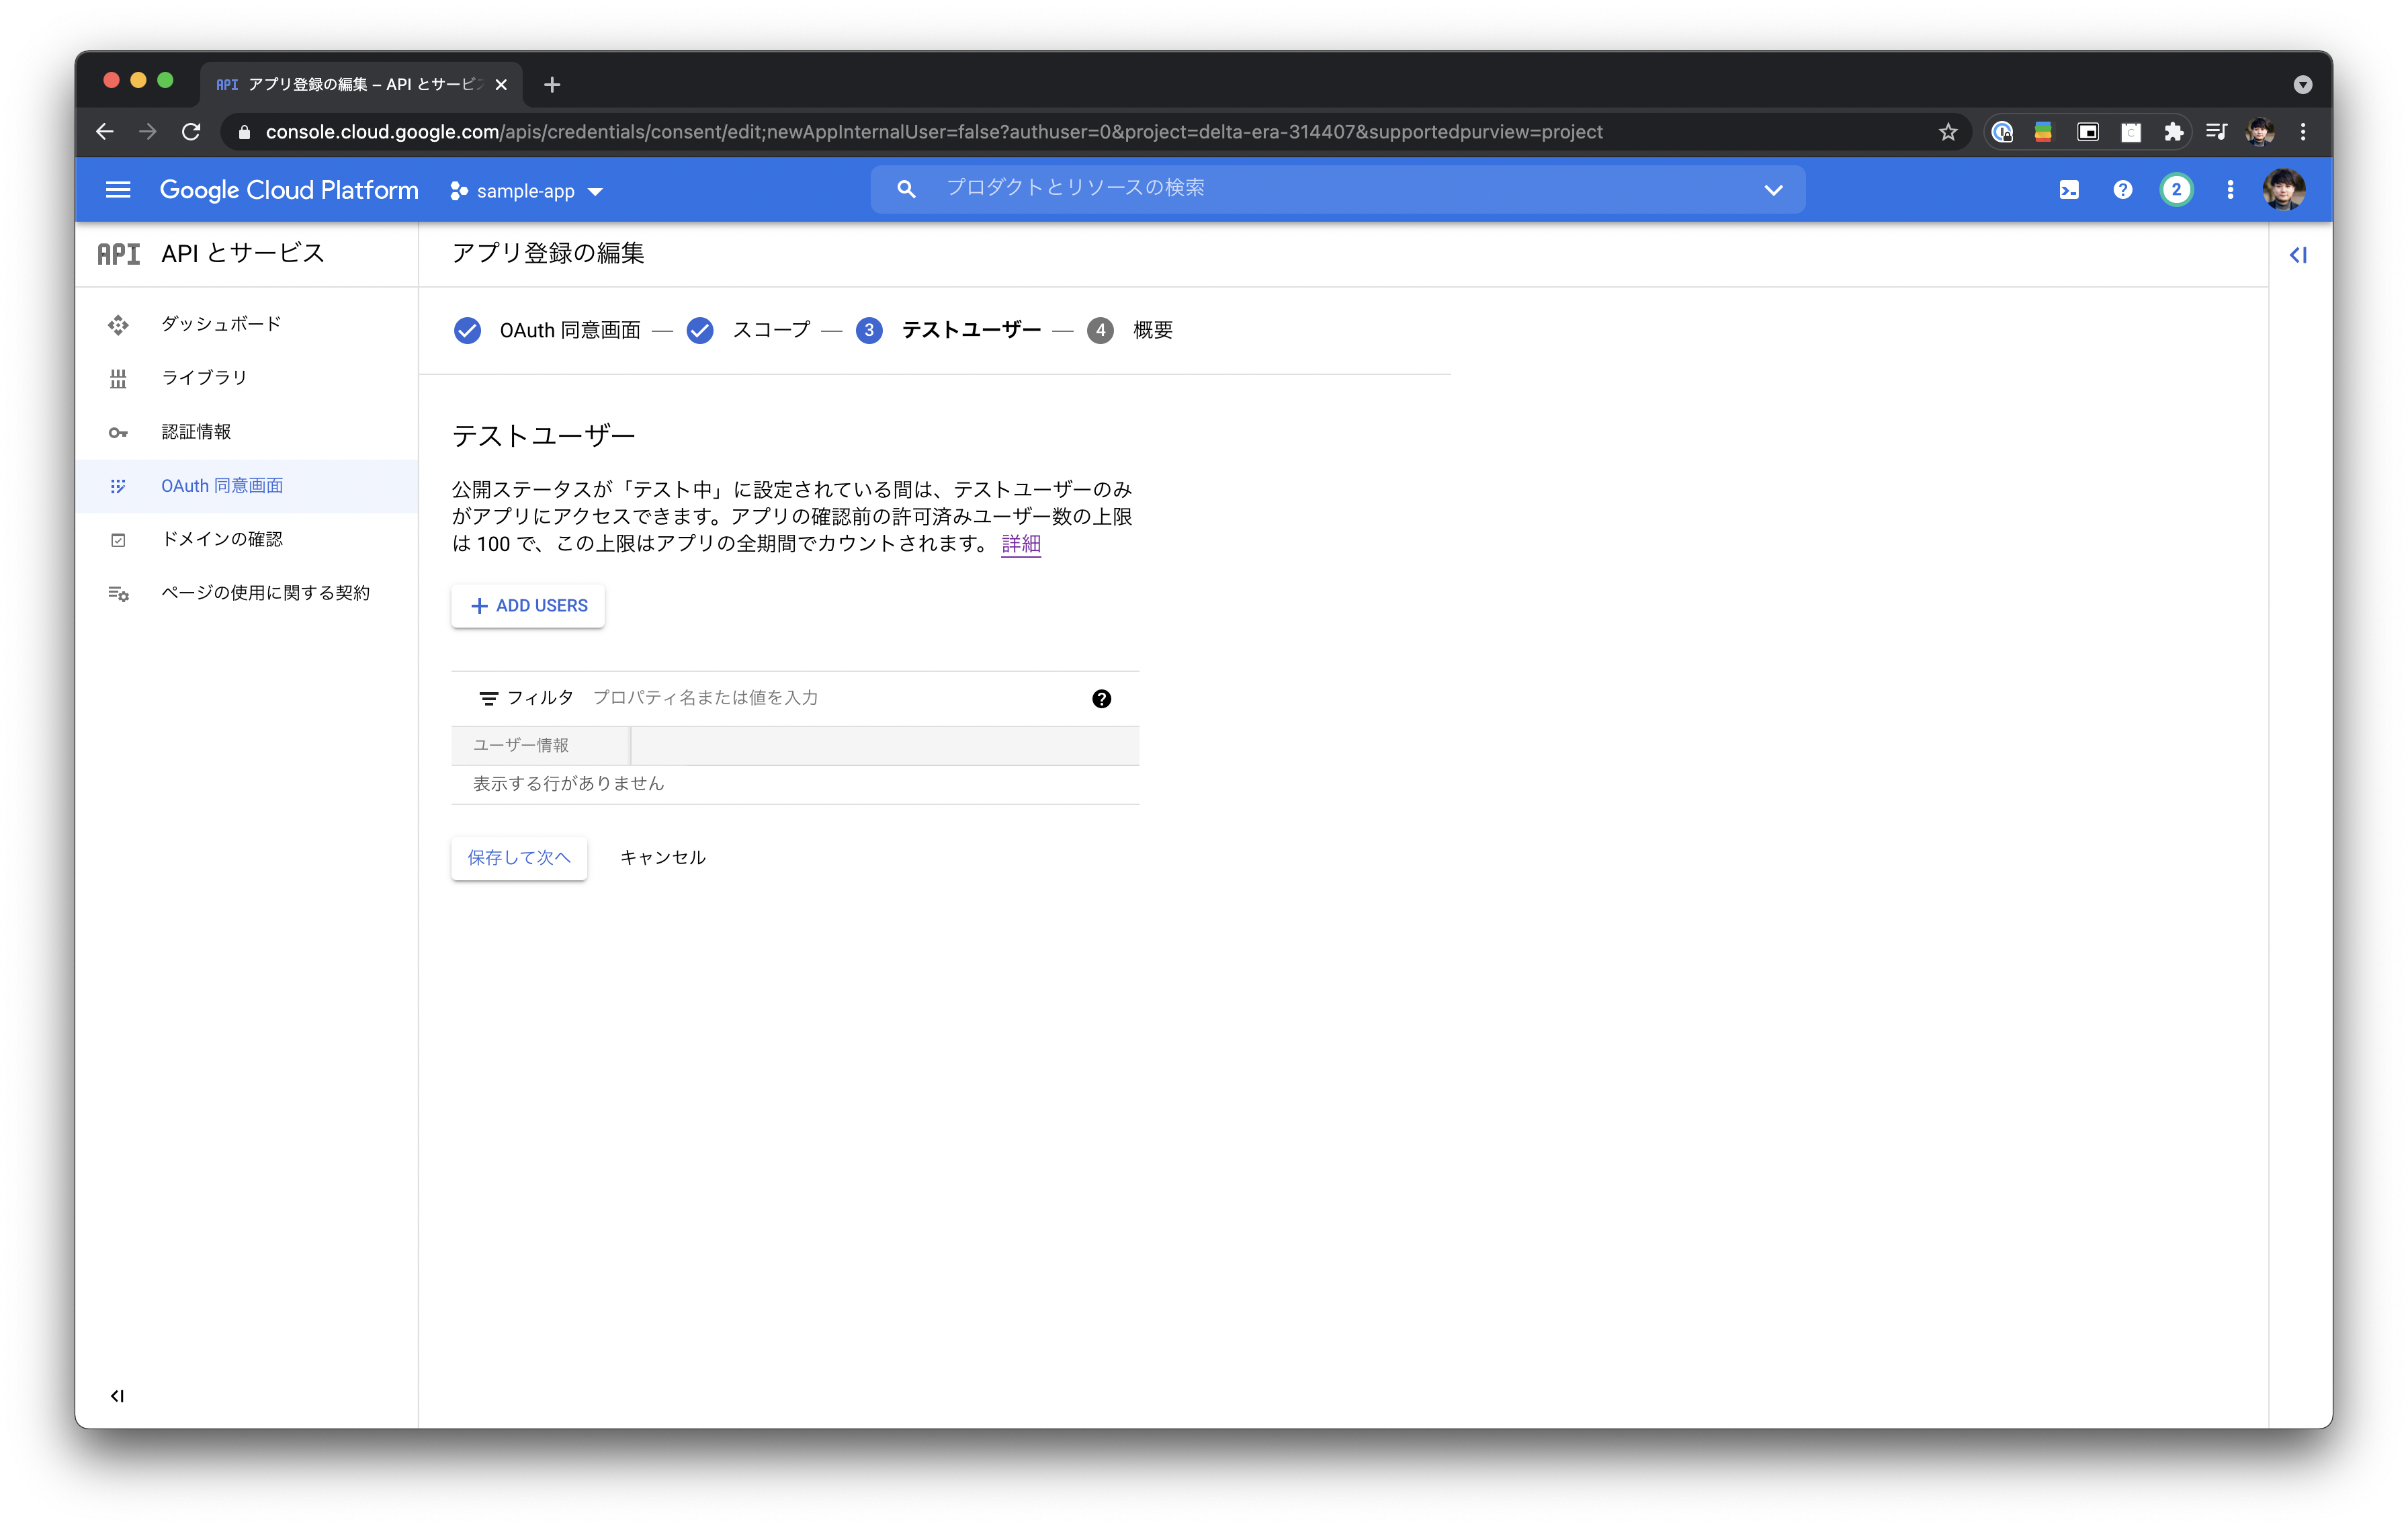
公開ステータスが「テスト中」に設定されている間は、テストユーザーのみがアプリにアクセスできるため、テストユーザーを追加します。
「ADD USERS」ボタンを押下し、ソリューションを試したいユーザーのメールアドレスを追加します。
テストユーザーを追加後、「保存して次へ」ボタンを押下します。
### 6. 認証情報を作成
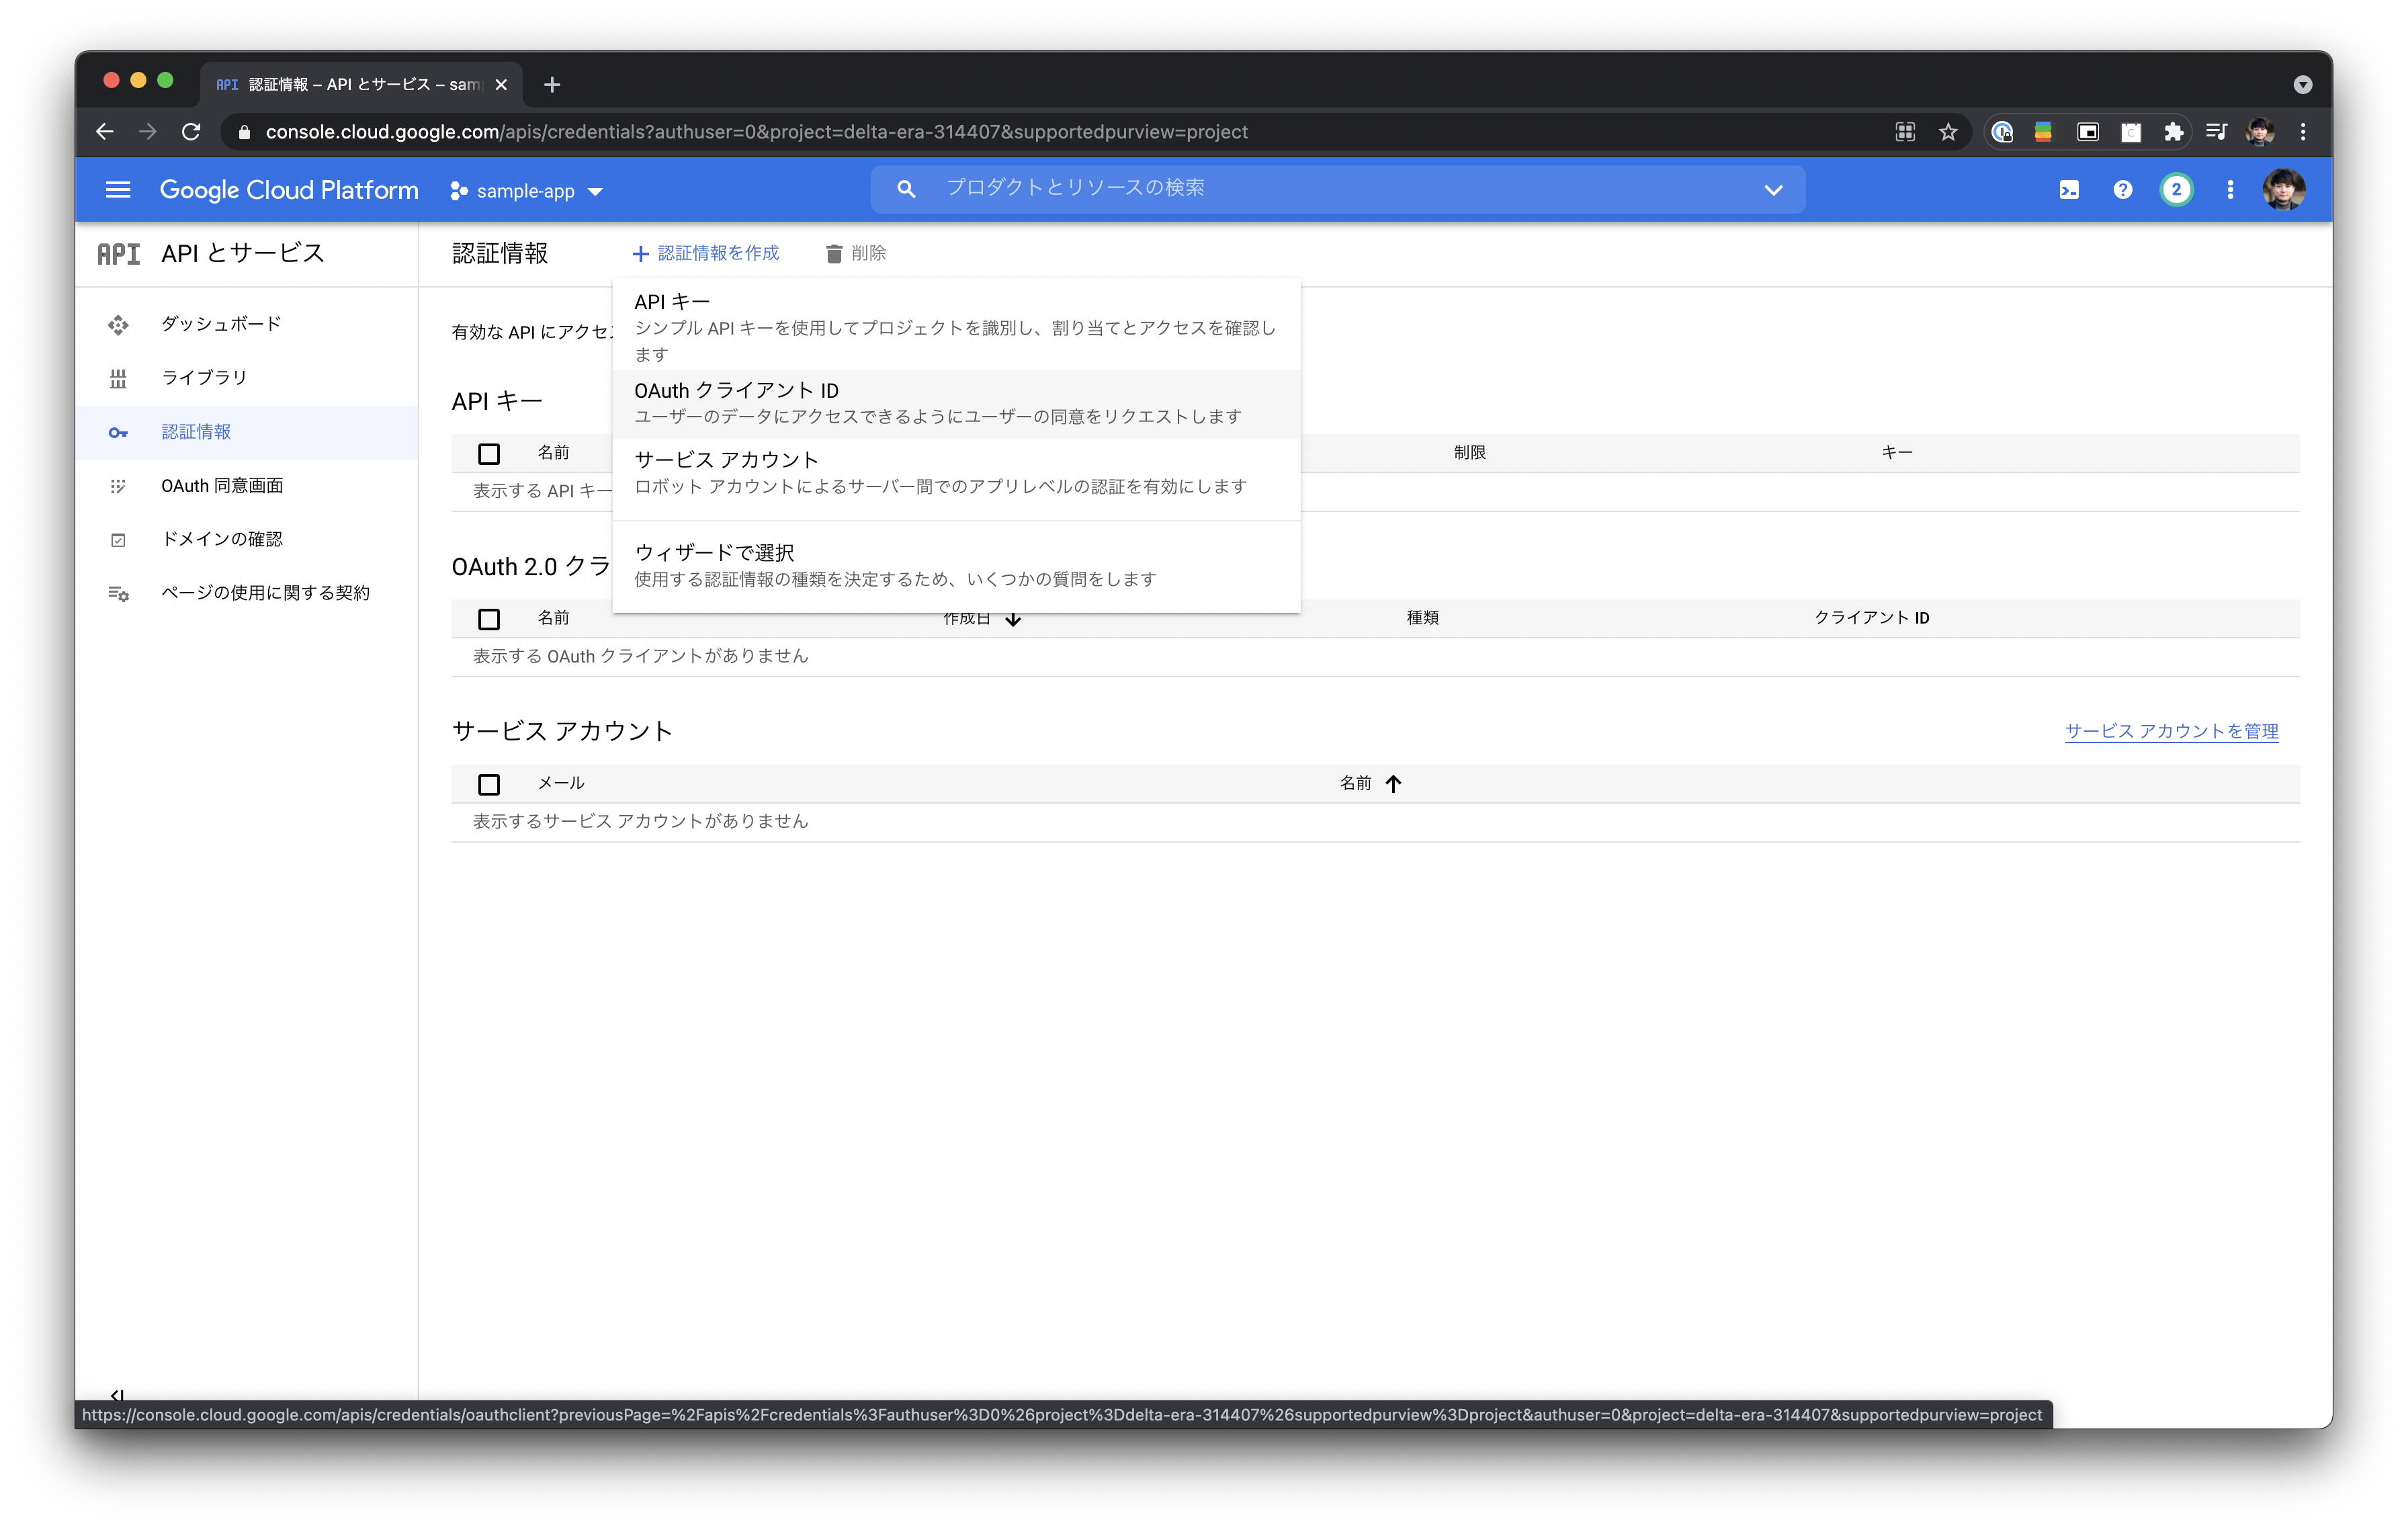
[認証情報](https://console.cloud.google.com/apis/credentials)にアクセスします。
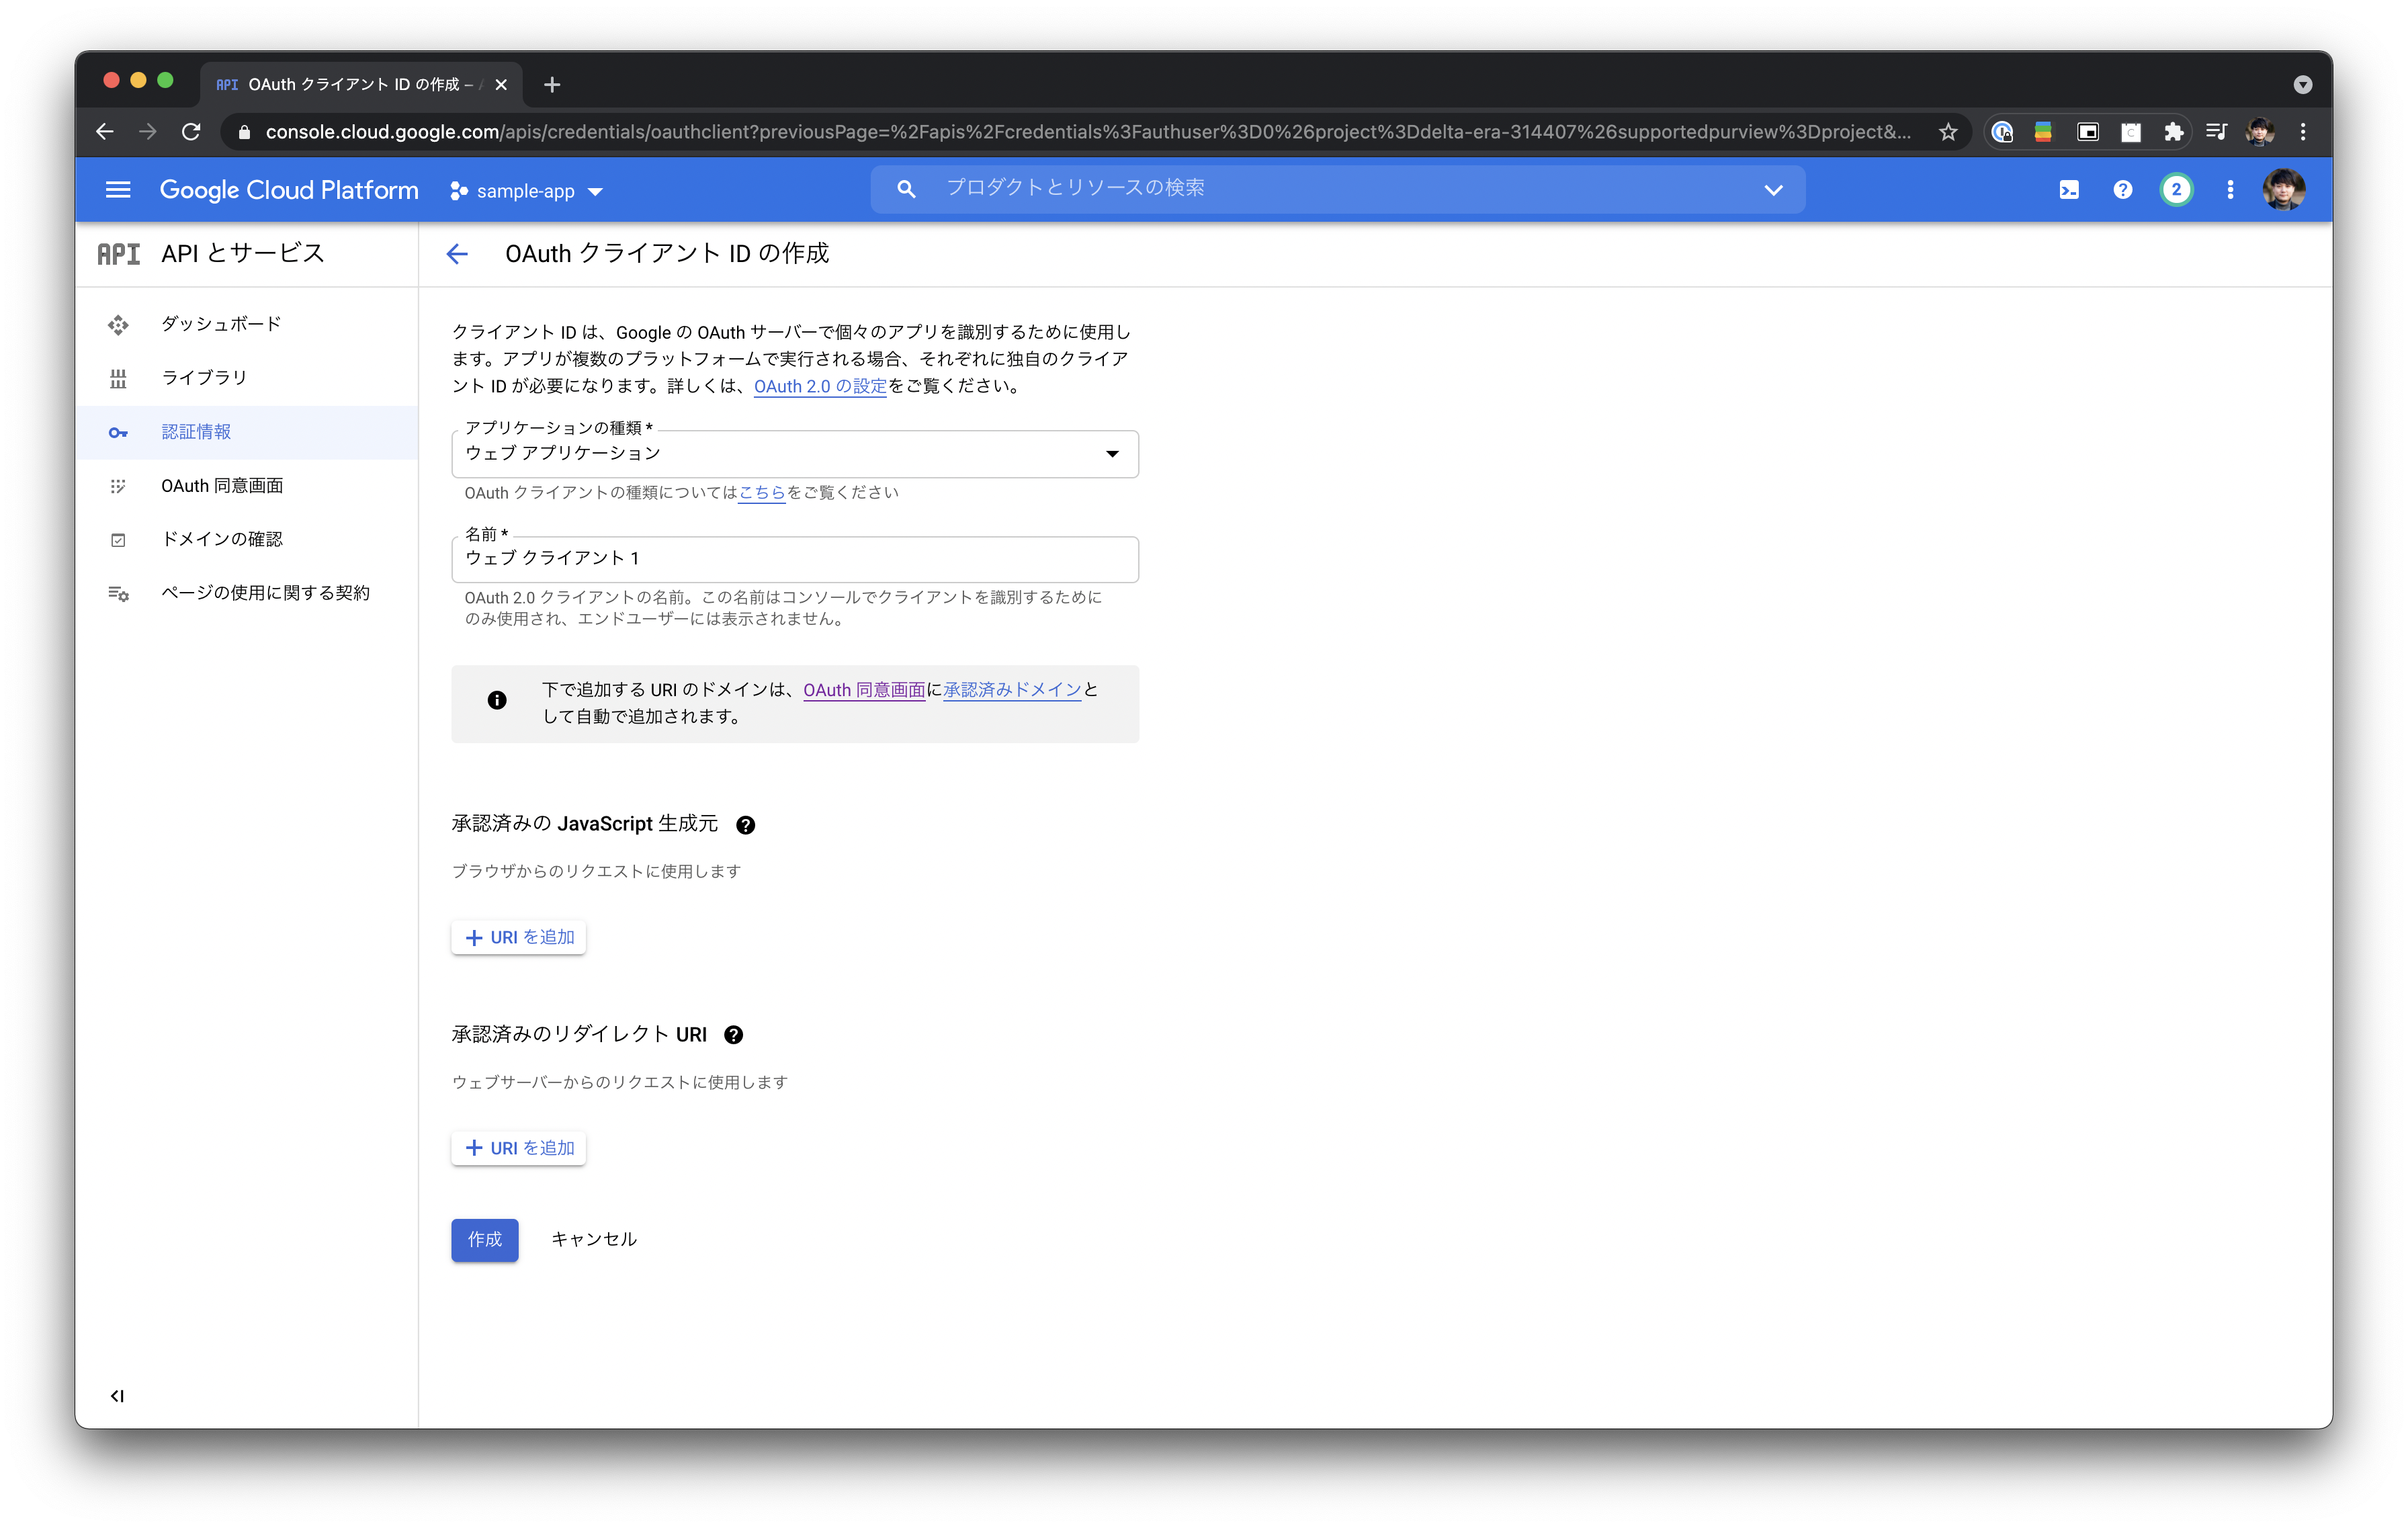
「認証情報を作成」ボタンを押下した後、「OAuth クライアント ID」を押下します。\
「アプリケーションの種類」を `ウェブアプリケーション` に設定します。
「承認済みのリダイレクト URI」については、以下を参照して設定してください。
[リダイレクトURLのDNS設定](/connectors/custom-oauth-client.md#dnsganaksu)
{% hint style="danger" %}
GoogleのOAuthアプリの場合、リダイレクトURL(CallbackURI)は承認済みドメインである必要があります。\
AnyflowのリダイレクトURLを設定すると、審査通過できないため上記のページを参照してください。
{% endhint %}
リダイレクトURLの設定後、「作成」ボタンを押下します。
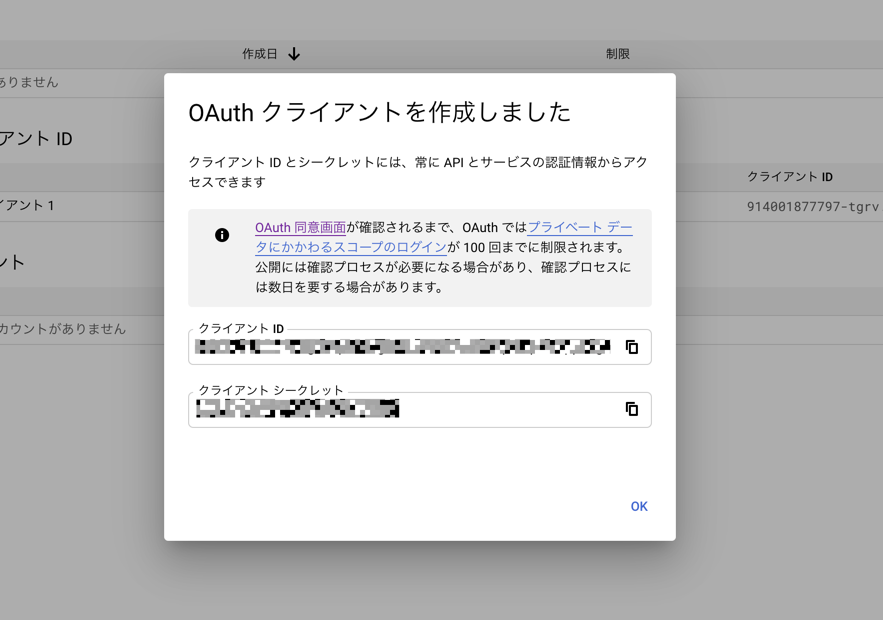
「作成」ボタン押下後、以下のようなモーダルウィンドウが表示されます。
モーダルウィンドウに表示されている `クライアント ID` と `クライアント シークレット` をコピーし、Anyflowチームに受け渡します。
### 7. ソリューションをテストする
ベンダープロダクトにAnyflowSDKを使ってソリューションを組み込みます。\
ウィザードを表示し、Google Driveの認証をする際に先ほど作成したアプリの名前やロゴが表示されていることを確認後、正常に認証ができればテストは完了です。
{% hint style="warning" %}
### 公開ステータスがテストのままだとどうなる?
公開ステータスがテストのままでも認証は可能ですが、アプリに権限を付与できるユーザーの数が100ユーザーまで制限されます。
{% endhint %}
### 8. OAuthアプリを本番環境にPushする
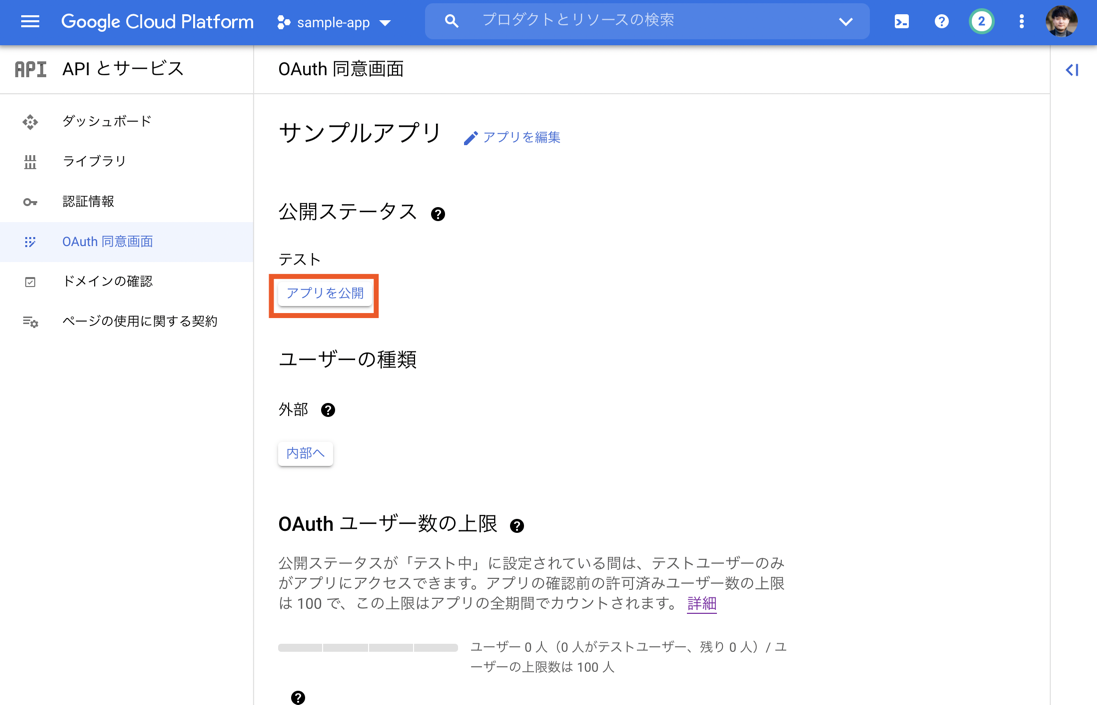
[OAuth 同意画面](https://console.cloud.google.com/apis/credentials/consent) にアクセスし、アプリを公開ボタンを押下し、モーダルウィンドウの「確認」を押下します。
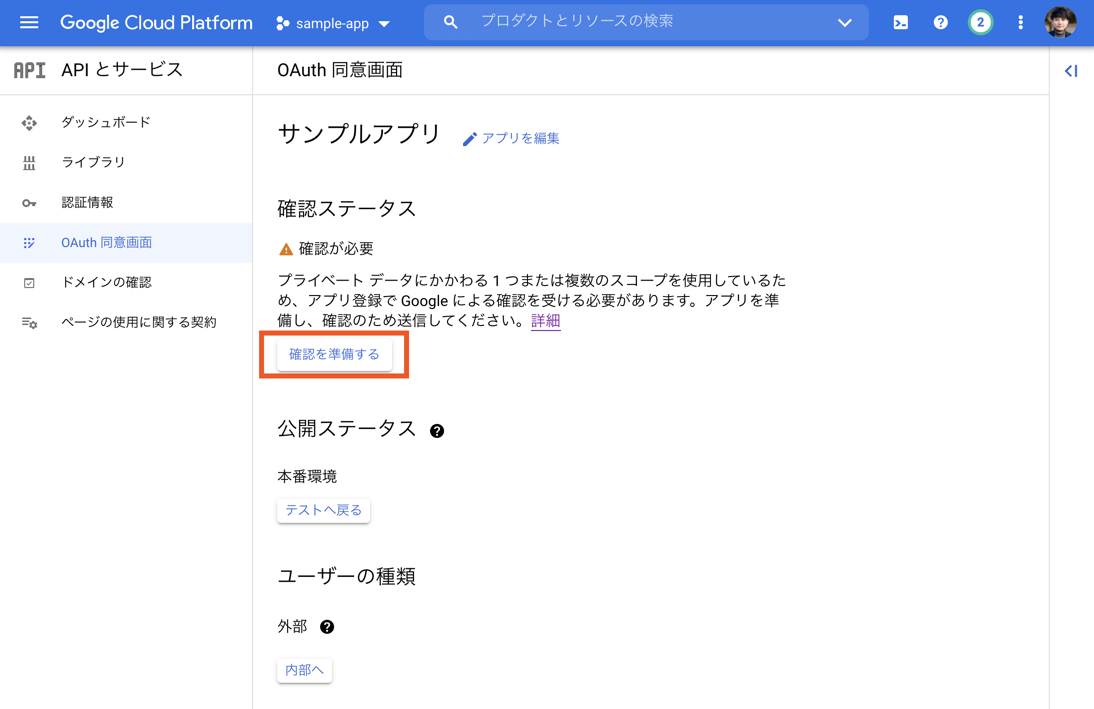
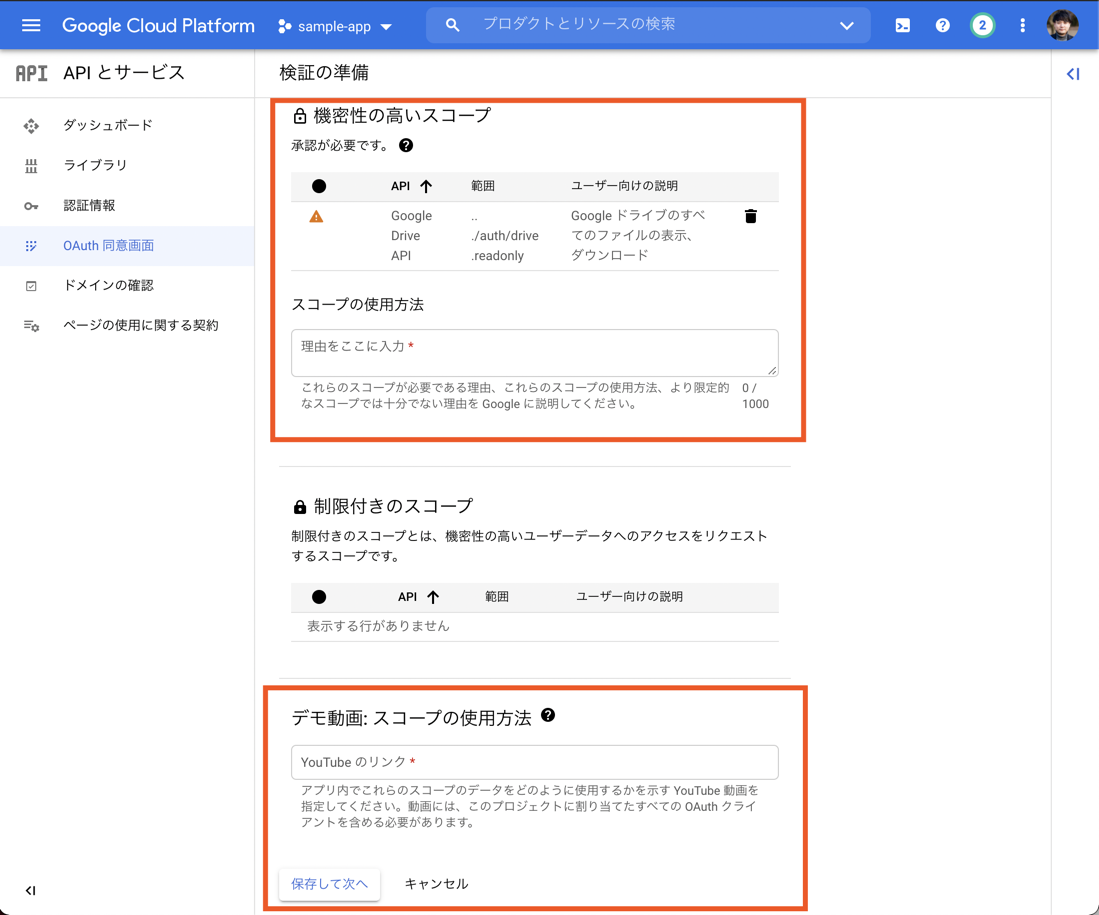
追加しているスコープによっては、以下の画像のようにステータスが`確認が必要` になるケースがありますので、場合に応じて「確認を準備する」ボタンを押下して必須項目を埋めます。
スコープが必要である理由や、デモ動画を入力し、「最終レビュー」セクションで、「確認のため送信」ボタンを押下し、Googleの審査を待ちましょう。
Google DriveのOAuthアプリを作成する例は以上です。
Google Workspaceサービス以外のSlackやSalesforceも類似した工程を踏むことで、OAuthアプリを作成できます。詳細は各サービスのドキュメントを参考にしてください。
---
# Agent Instructions
This documentation is published with GitBook. GitBook is the documentation platform designed so that both humans and AI agents can read, navigate, and reason over technical content effectively. Learn more at gitbook.com.
## Querying This Documentation
If you need additional information that is not directly available in this page, you can query the documentation by asking a question.
Perform an HTTP GET request on the following URL with the `ask` and `goal` query parameters:
```
GET https://docs-embed.anyflow.jp/recipe/groupware/custom-oauth-google-drive.md?ask=&goal=
```
`ask` is the immediate question: it should be specific, self-contained, and written in natural language.
`goal` is what the user is ultimately trying to achieve, the reason they need the answer. Sharing it helps GitBook give you a better, more relevant answer. A goal is most helpful when it describes the outcome the user wants rather than restating the question. For example, with `ask=how do I create an API token`, a goal like `automate deployments from our CI pipeline` lets GitBook tailor the answer to that use case.
The response will contain a direct answer to the question and relevant excerpts and sources from the documentation.
Use this mechanism when the answer is not explicitly present in the current page, you need clarification or additional context, or you want to retrieve related documentation sections.